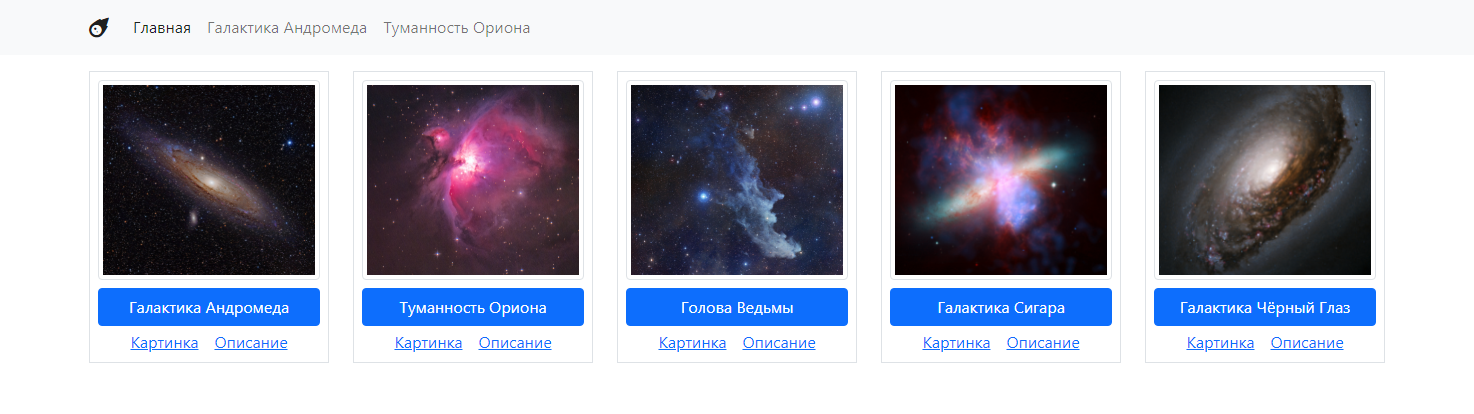
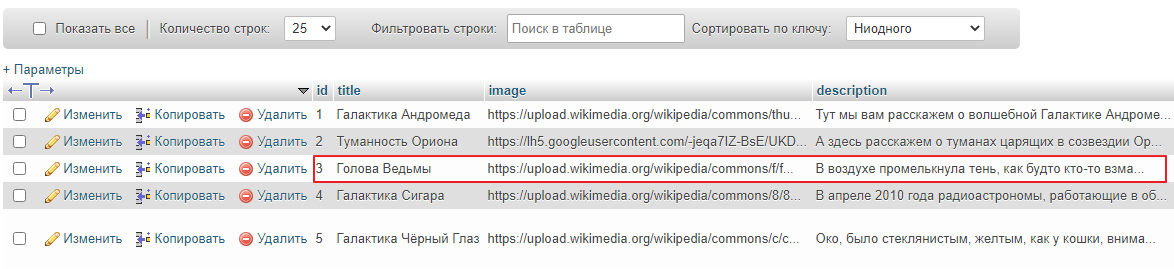
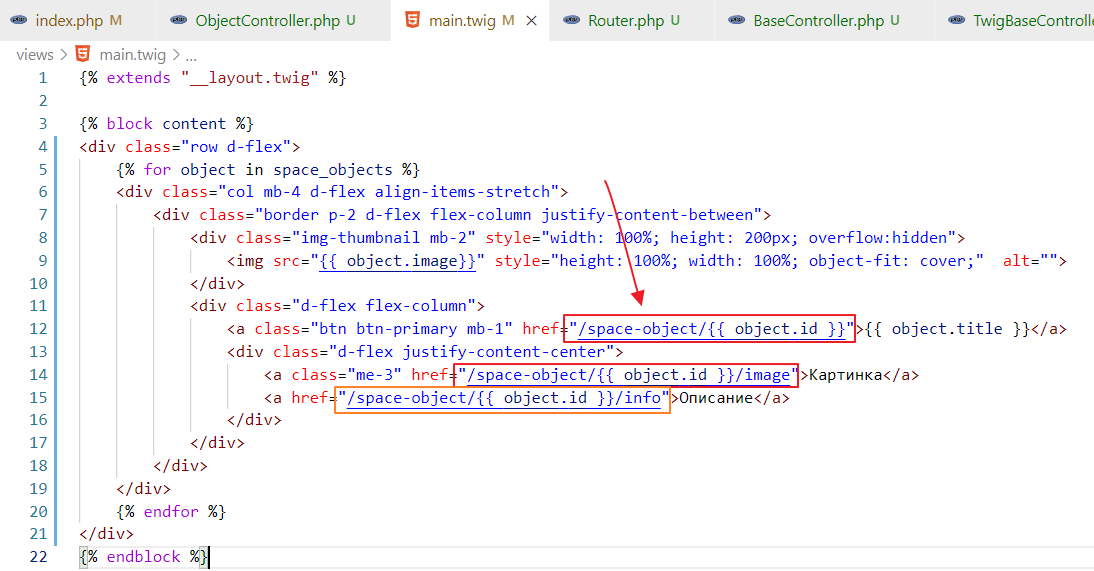
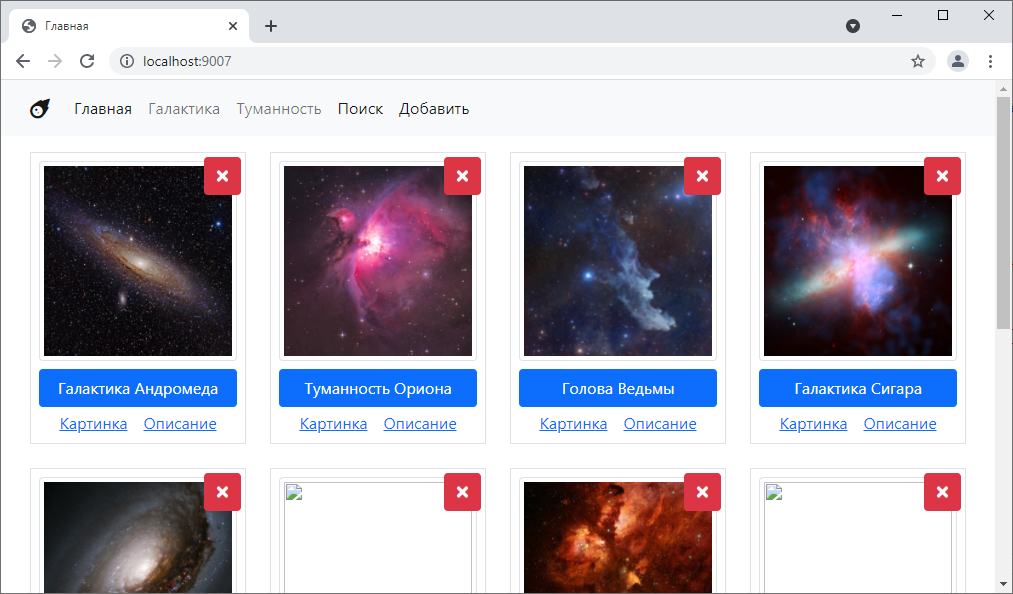
Revise the application so that the list on the main page is generated based on data from their database.
For now, just add links with empty href. Add an image. Rerun it on Flex to make it look something like this:
Revise the application so that the list on the main page is generated based on data from their database.
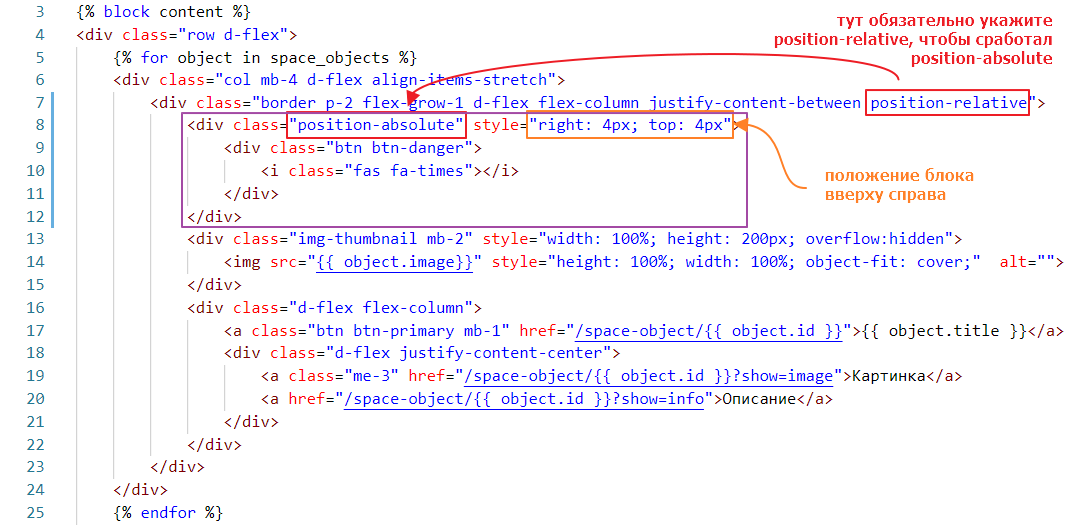
For now, just add links with empty href. Add an image. Rerun it on Flex to make it look something like this:
Make sure that:
Image and Description links also take data from the database.
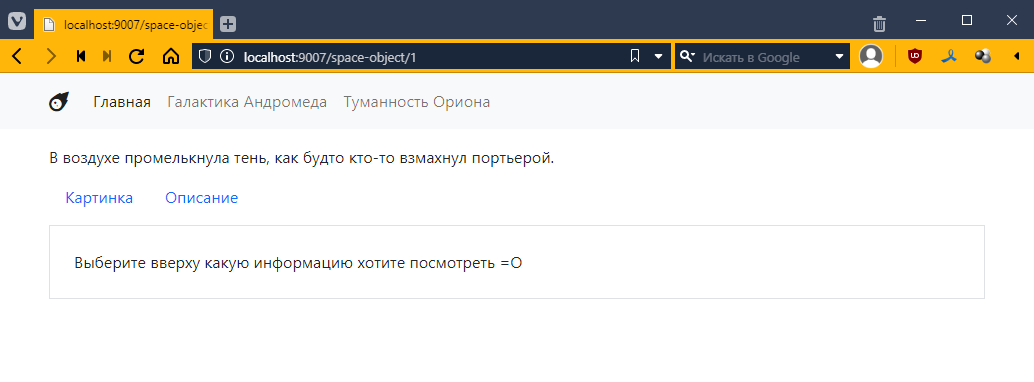
Rewrite ObjectController.php so that it contains logic for both ObjectImageController.php and ObjectInfoController.php, i.e., the decision to display an image, brief information, or full information is made based on the get parameters. For example:
http://localhost:9007/space-object/1 – general informationUpdate all links accordingly. Remove the ObjectImageController.php and ObjectInfoController.php controllers.
To be completed:
Something like this:
Here we will look at deleting objects. It’s so simple that I can’t even think of a task 😢
Implement the ability to edit objects
CRUD is an acronym for Create-Read-Update-Delete. It refers to a set of standard operations that can be performed on data.
In the previous lab, we brought the system to a state where we clearly distinguished controllers and views, i.e., the letters VC from the abbreviation MVC. Now we need to get the model, i.e., the data, from somewhere.
So, in addition to PHP, Laragon also has MySQL built in, i.e., a database management system (DBMS).
A database is actually just a file or folder with files in which data is stored in a special way.
A management system is a special program that can access this database and extract data from it.
The management system also has all kinds of additional information about the data, such as which data is used most often, various access checks, and other things that expand the possibilities for data manipulation.
Here we will create a simple database with one table, into which we will put several objects. These are the same objects we worked with before. Only there, everything was written in files, and here we will store it in a database. For me, these are Andromeda and Orion.
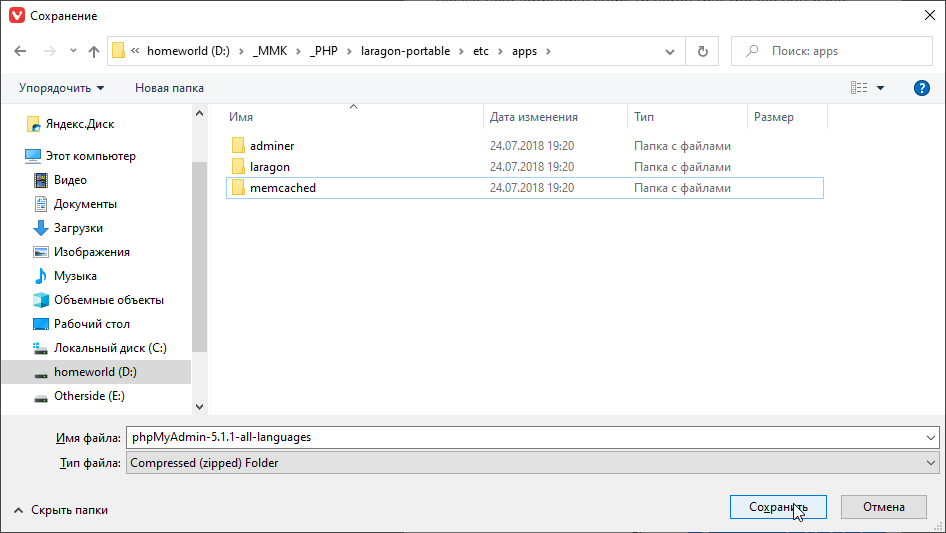
But in order to make all our data manipulations more convenient, let’s first install phpMyAdmin. This phpMyAdmin is simply a web application written in php, from which you can conveniently manage the database.
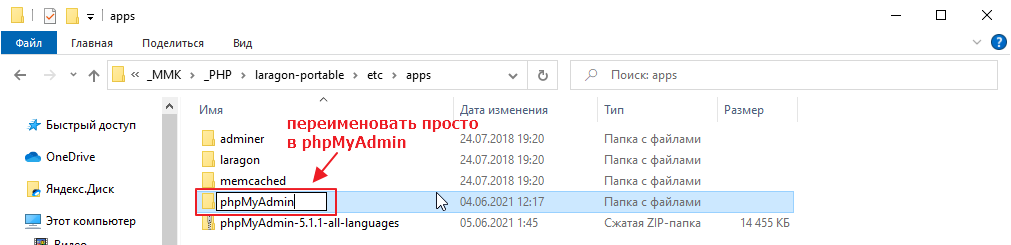
Go to the website https://www.phpmyadmin.net and download
Save it to the /etc/apps folder:
and unpack it:
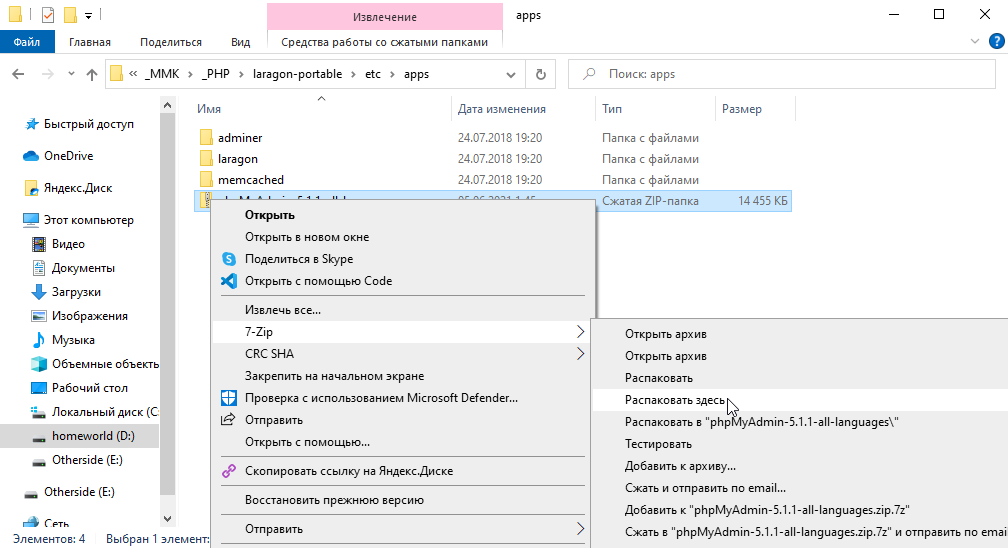
then rename it
Now you can go to http://localhost/phpMyAdmin/ and see:

but we won’t go inside yet, as the database is not configured.
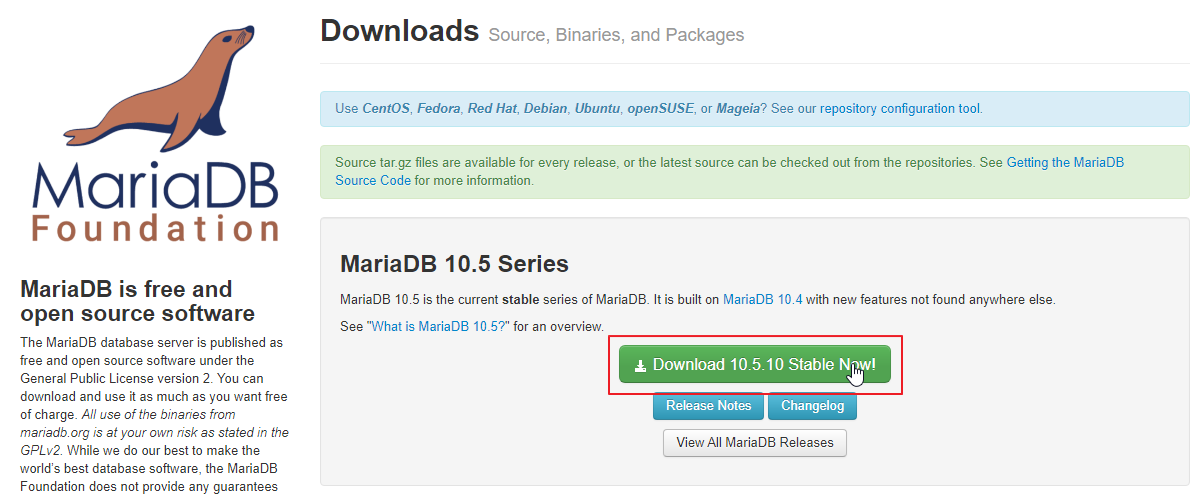
First, let’s deal with MySQL. Laragon has a very outdated version built in, which phpMyAdmin can no longer work with.
On the other hand, if you try to update MySQL, a more or less adequate version weighs about 800MB, which is obviously too much.
Therefore, we will use an alternative to the MySQL DBMS called mariadb. It is fully compatible with MySQL and is developed as a completely free, open-source alternative to MySQL. It is often included in various Linux distributions by default.
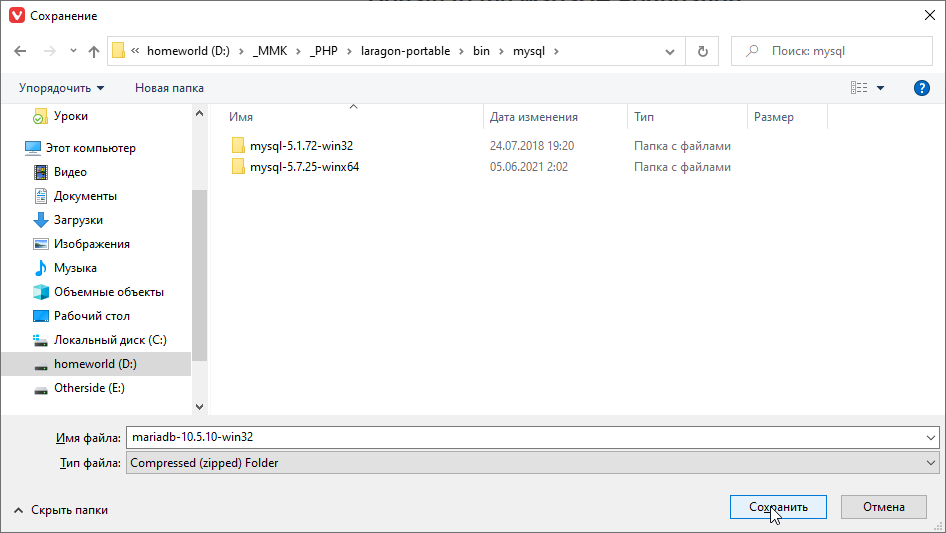
In general, go here https://downloads.mariadb.org and click download
select the zip archive
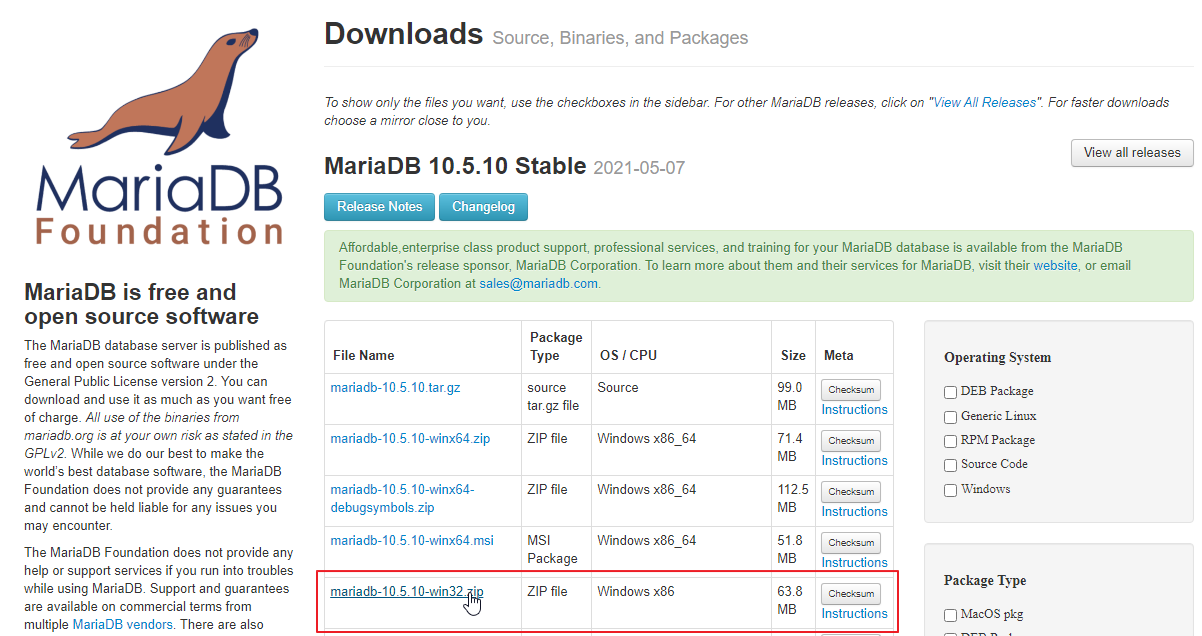
and save it to a folder
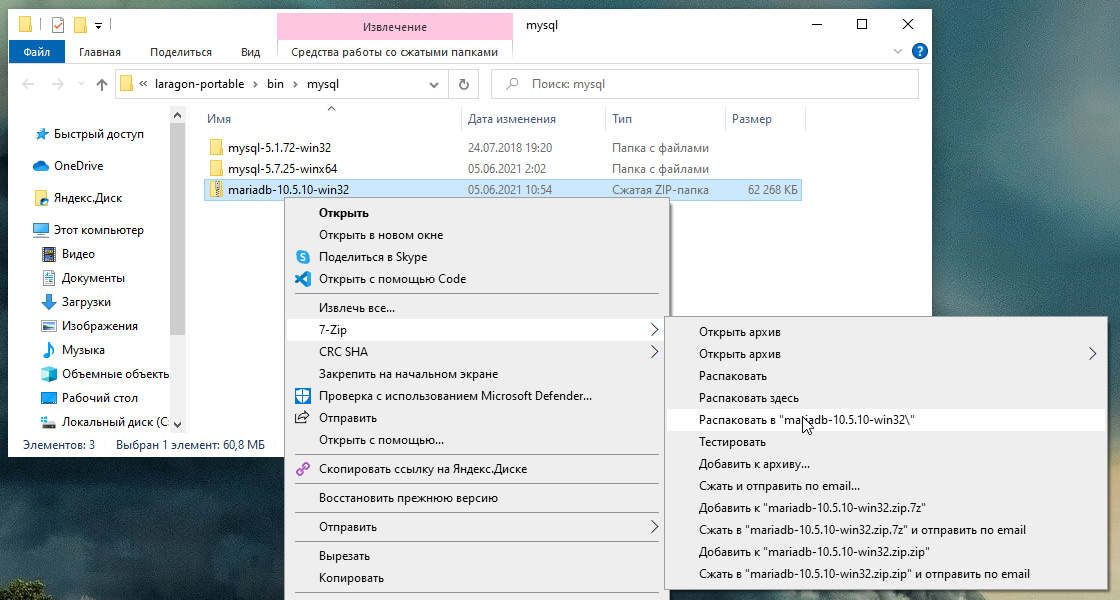
unzip it
Then stop Laragon
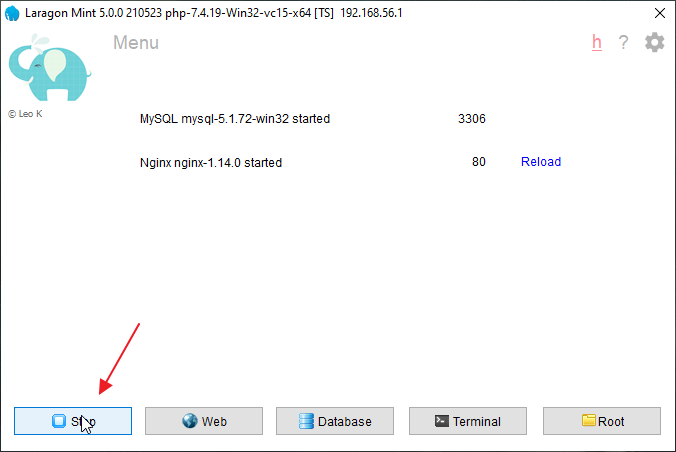
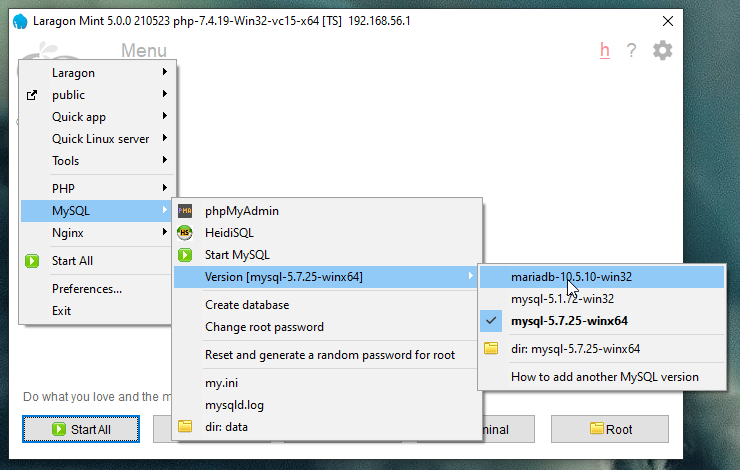
Switch mysql to mariadb
And start everything back up.
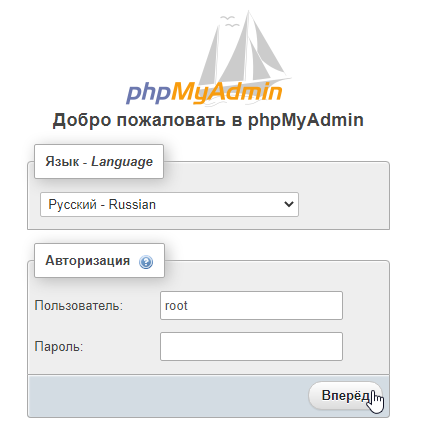
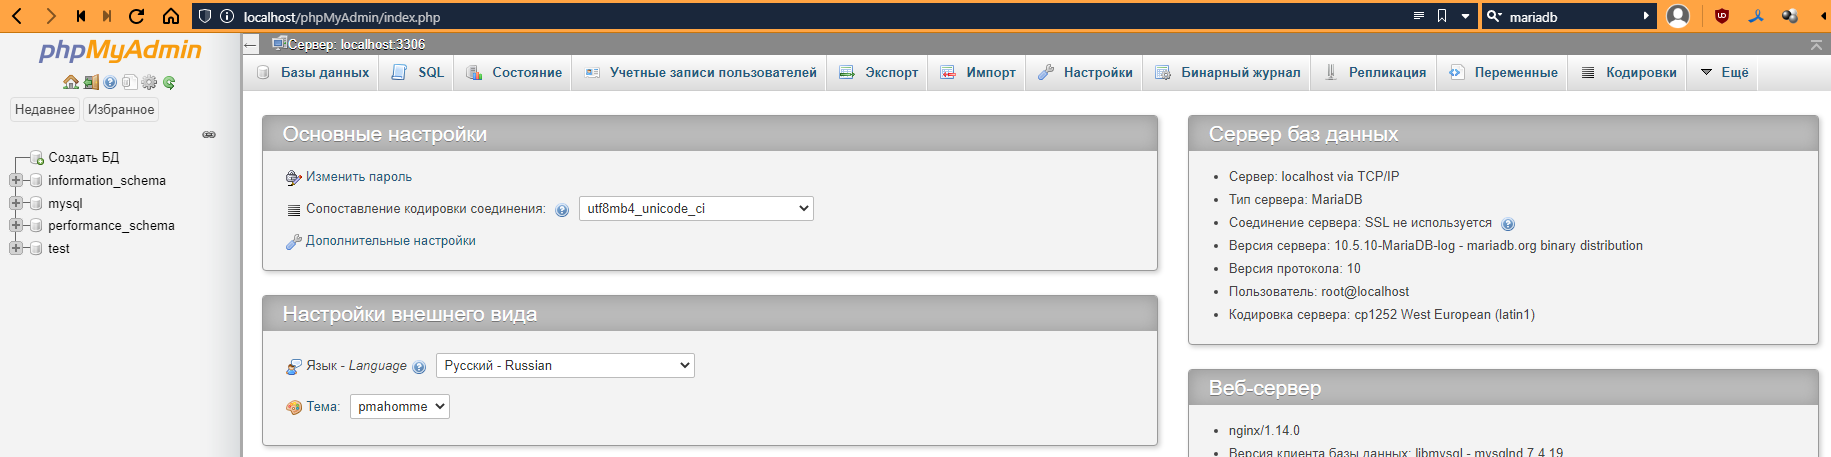
Now you can actually log in via phpMyAdmin. Go here http://localhost/phpMyAdmin/
and enter your login details (username: root, password: blank):
and see this:
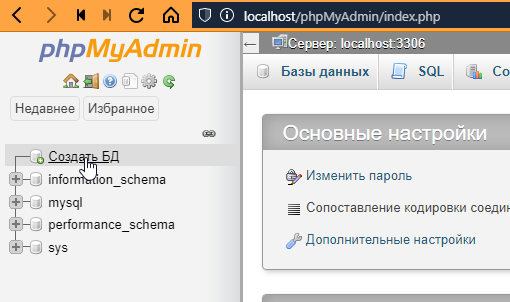
Click on “Create Database” on the left.
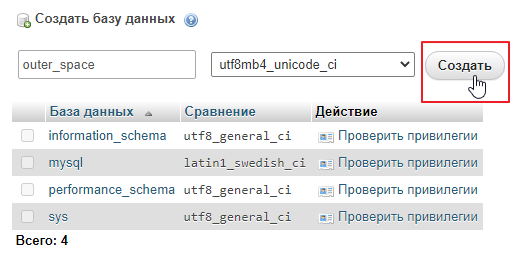
Enter the name of the database (I will call it “outer_space”) and select the encoding “utf8mb4_unicode_ci.” Why this one? You can read about it here: https://ru.stackoverflow.com/questions/757733/
That’s it, click Create:
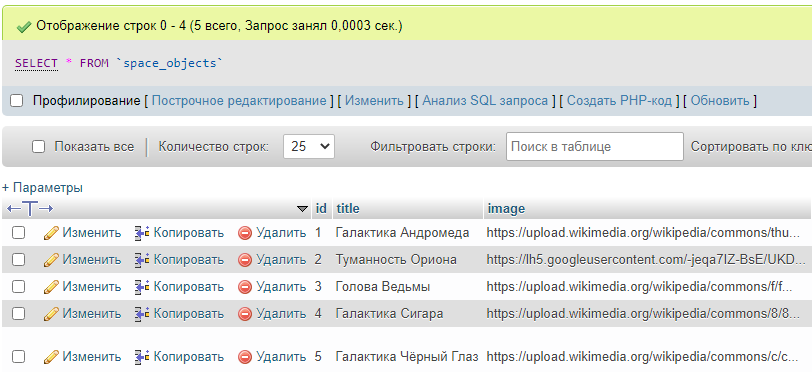
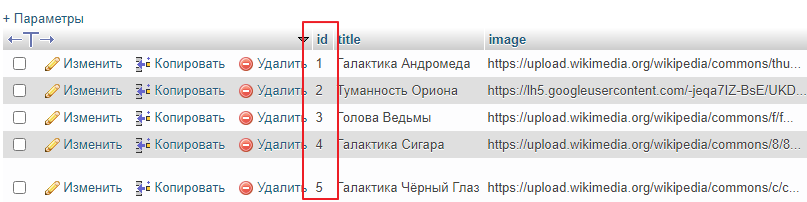
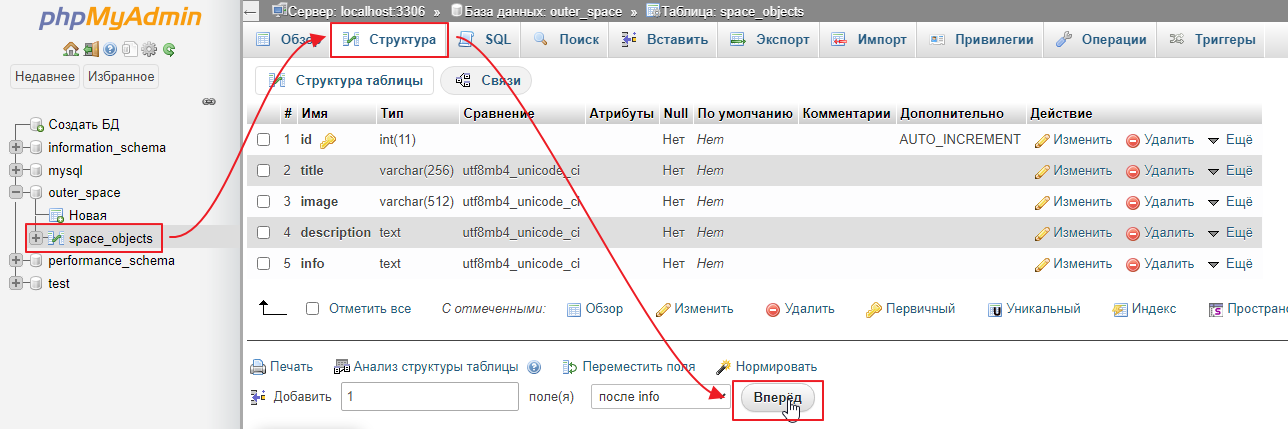
We will be notified that the database has been created. Now let’s add a table to it.
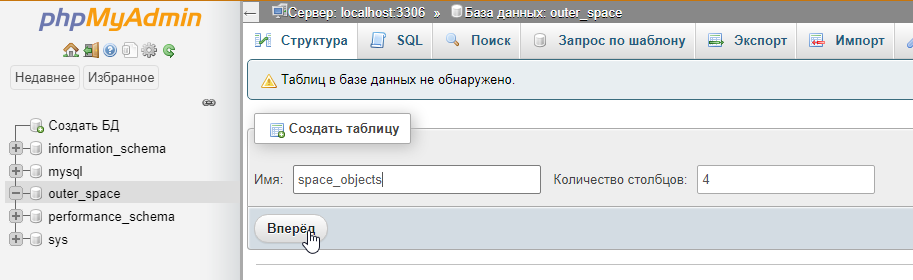
The number of columns does not really matter, as you can always add new ones or remove unnecessary ones later.
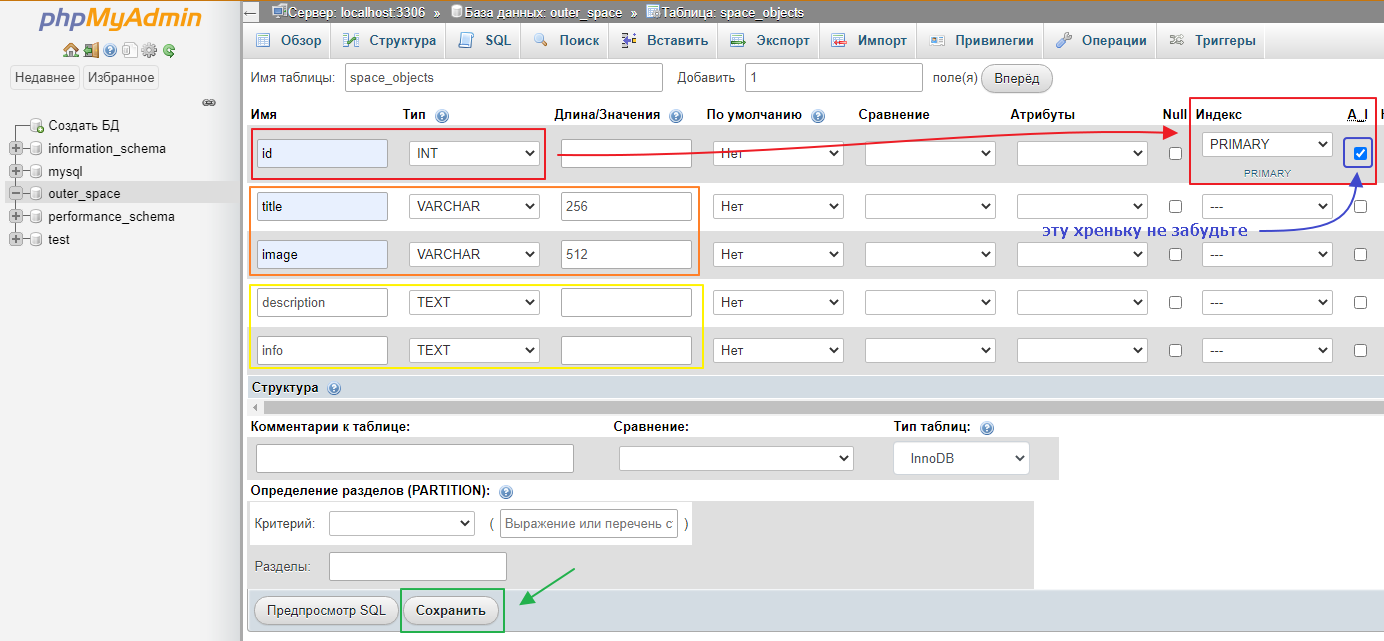
In general, when you have entered everything, you can click “Save” and start filling it in:

Enter the data and click “Next.”
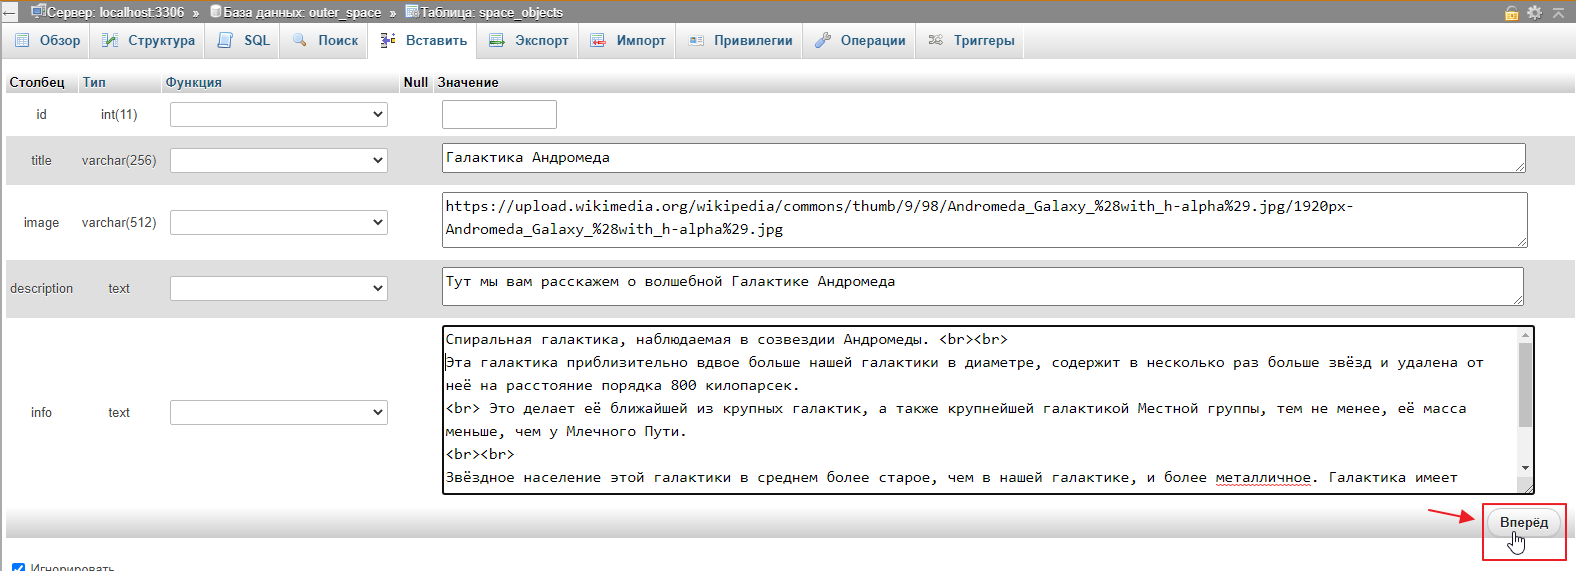
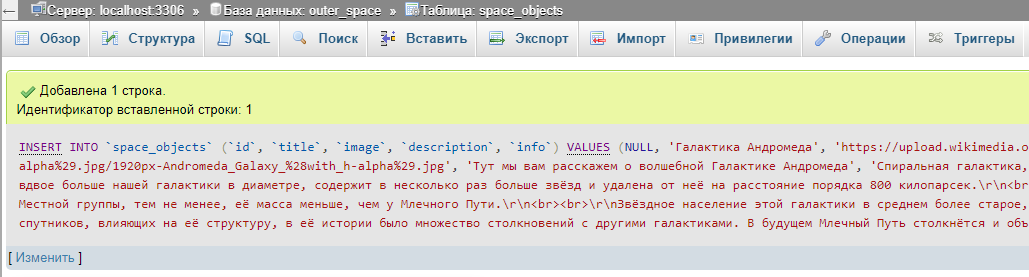
We get this result
Click Insert again and repeat the procedure. In principle, 5 items will be enough for us:
A special PDO class is built into PHP for communicating with databases.
It can be used to connect to most popular databases and execute various queries.
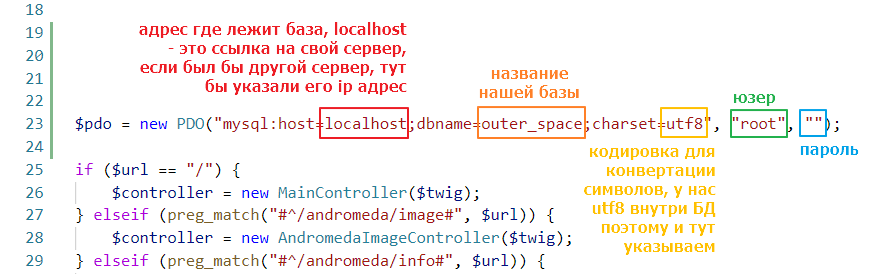
To start communicating with the database, you need to create a connection. This is very easy to do. Go to index.php and write:
<?php
// ...

$controller = new Controller404($twig);

// create an instance of the class and pass the connection parameters to it
// creating the class automatically opens the connection
$pdo = new PDO("mysql:host=localhost;dbname=outer_space;charset=utf8", "root", "");

// leave the rest as is
if ($url == "/") {
    $controller = new MainController($twig);
} elseif (preg_match("#^/andromeda/image#", $url)) {
// ...
The meanings of the values are as follows:
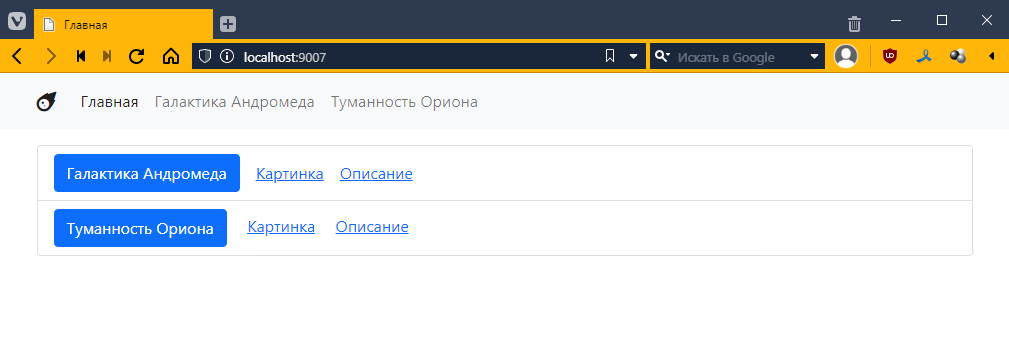
Let’s try to open the main page. If nothing has changed there, it means we connected successfully:
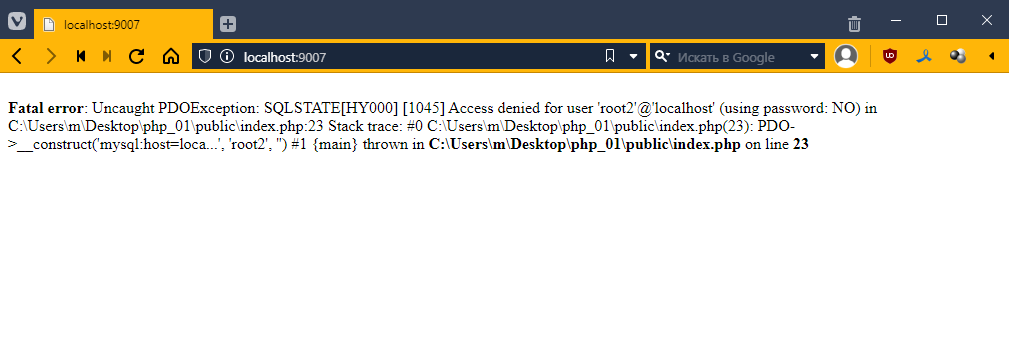
If the connection doesn’t work, we’ll see some kind of error, and then we’ll have to figure out what’s going on
In general, we believe that everything is OK.
To be able to access the database from the controller, let’s add the $pdo field and a setter for it to BaseController
<?php

abstract class BaseController {
    public PDO $pdo; // added a field

    public function setPDO(PDO $pdo) { // and a setter for it
        $this->pdo = $pdo;
    }
    // leave the rest untouched
    public function getContext(): array {
        return [];
    }

    abstract public function get();
}
and now let’s add a call to this method before calling get
<?php
// ...

// leave this alone
$pdo = new PDO("mysql:host=localhost;dbname=outer_space;charset=utf8", "root", "");

if ($url == "/") {
    // ...
}

if ($controller) {
    $controller->setPDO($pdo); // and here we pass PDO to the controller
    $controller->get();
}
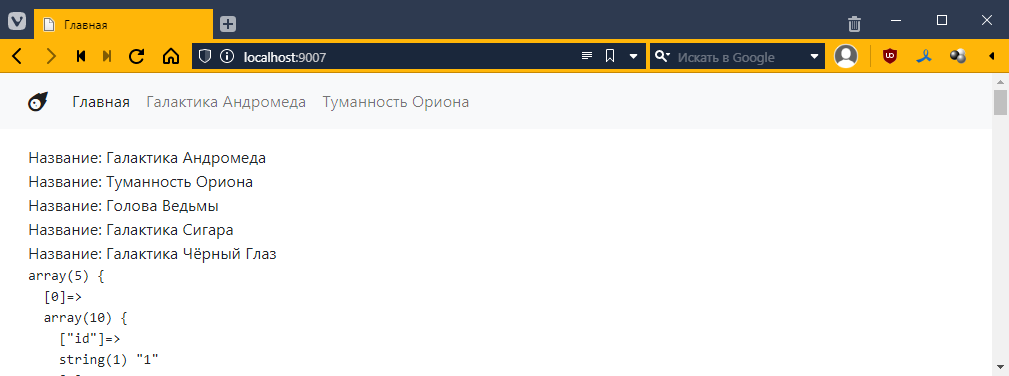
Let’s try to display data from our table on the main page. Go to MainController
<?php
require_once "TwigBaseController.php";

class MainController extends TwigBaseController {
    public $template = "main.twig";
    public $title = "Home";


    // add the getContext() method
    public function getContext(): array
    {
        $context = parent::getContext();

        // prepare the SELECT * FROM space_objects query
        // it is generally not recommended to use an asterisk, but it will work for the first time
        $query = $this->pdo->query("SELECT * FROM space_objects");

        // Fetch data using fetchAll() and save the result in the context
        $context["space_objects"] = $query->fetchAll();

        return $context;
    }
}
Now let’s go to main.php and see what ended up in space_objects. Let’s add this there:
{% block content %}
<pre>
{{ dump(space_objects) }} <!-- added data output -->
</pre>
<ul class="list-group">
    <!-- ... -->
</ul>
{% endblock %}
However, if we run the page now, we will see an error
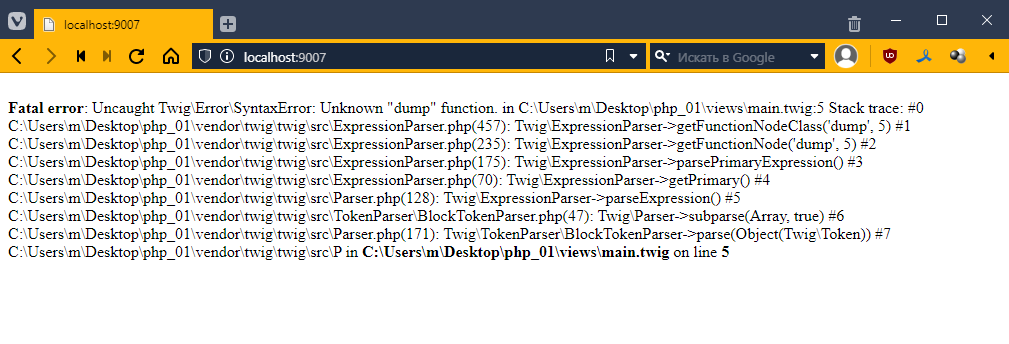
The thing is, Twig has a debug mode, which is disabled by default and only available if you enable it manually. And the special dump function is only available in this mode.
Therefore, we need to enable it first. This is quite simple to do. Go to index.php
<?php
// ...

$url = $_SERVER["REQUEST_URI"];

$loader = new \Twig\Loader\FilesystemLoader("../views");
$twig = new \Twig\Environment($loader, [
    "debug" => true // add debug mode here
]);
$twig->addExtension(new \Twig\Extension\DebugExtension()); // and activate the extension
refresh the page
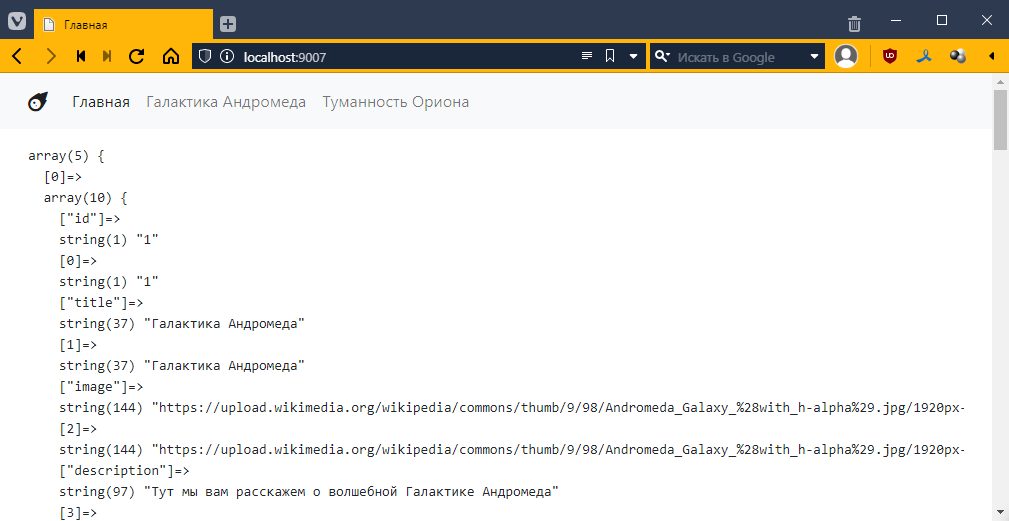
oh! the data is there! =)
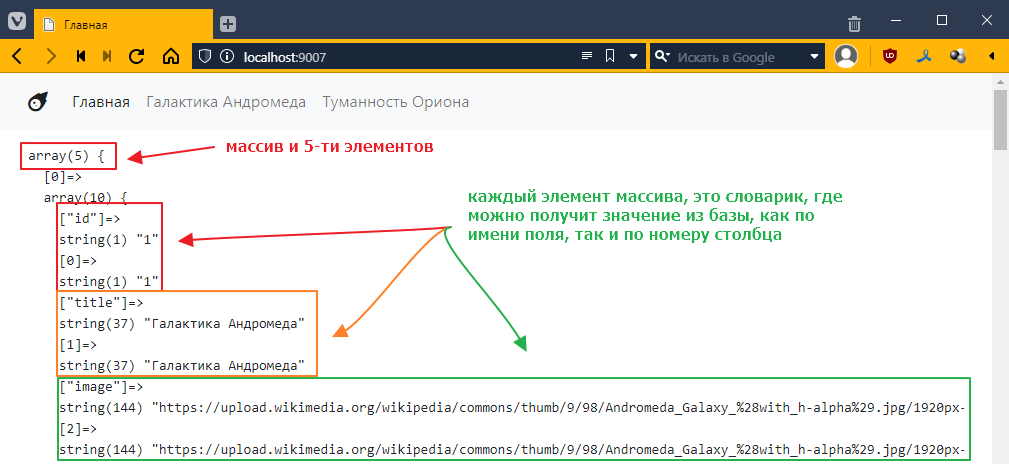
Generally, if we look at it, we will see:
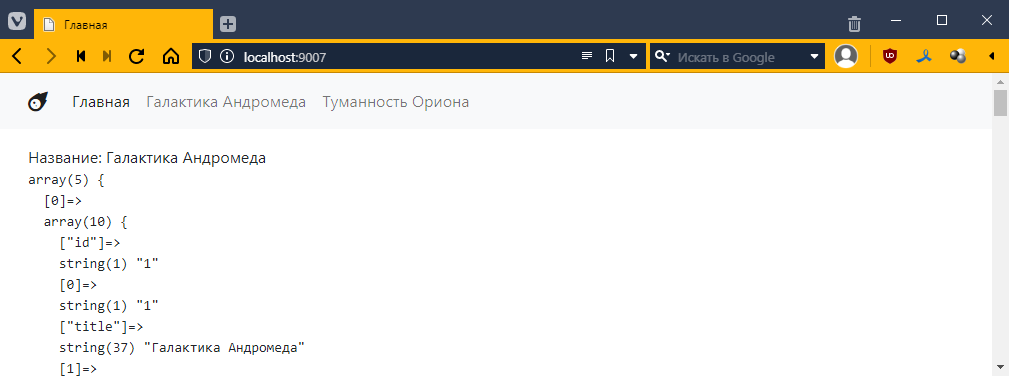
Let’s display the name of the first element:
{% extends "__layout.twig" %}

{% block content %}
Title: {{ space_objects[0].title }}

<!-- ... -->
The result will be as follows:
However, since we requested a list of objects, it makes sense to display all elements, using the familiar for loop:
{% extends "__layout.twig" %}

{% block content %}

{% for object in space_objects %}
    Title: {{ object.title }} <br>
{% endfor %}

<!-- ... -->
And then we get this:
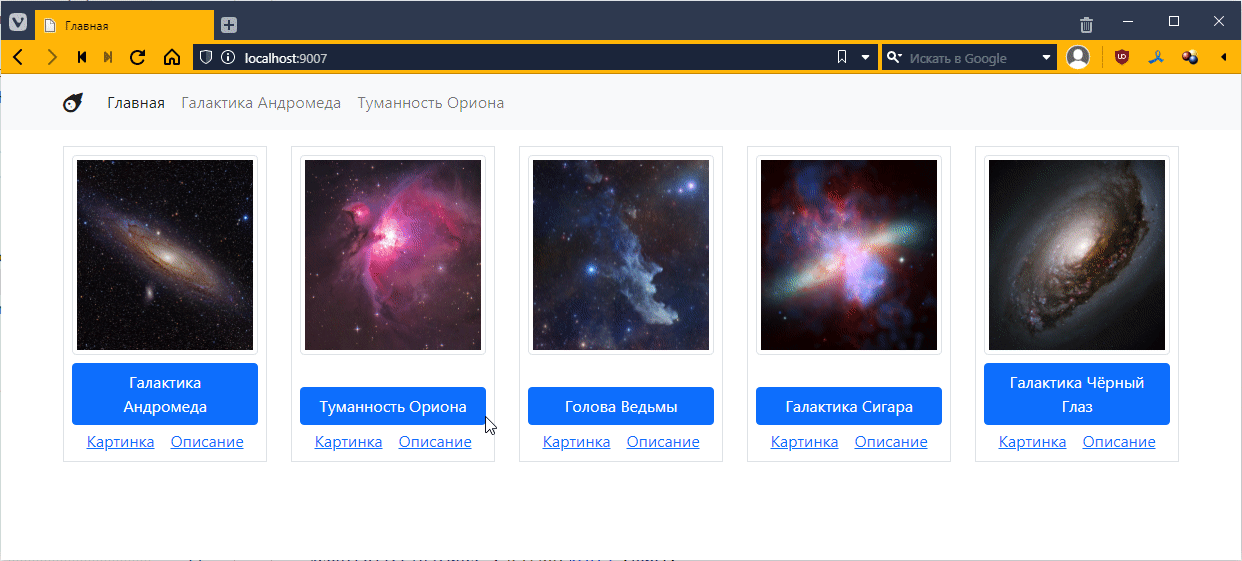
Well, I think the idea is clear, now we can do the task =)
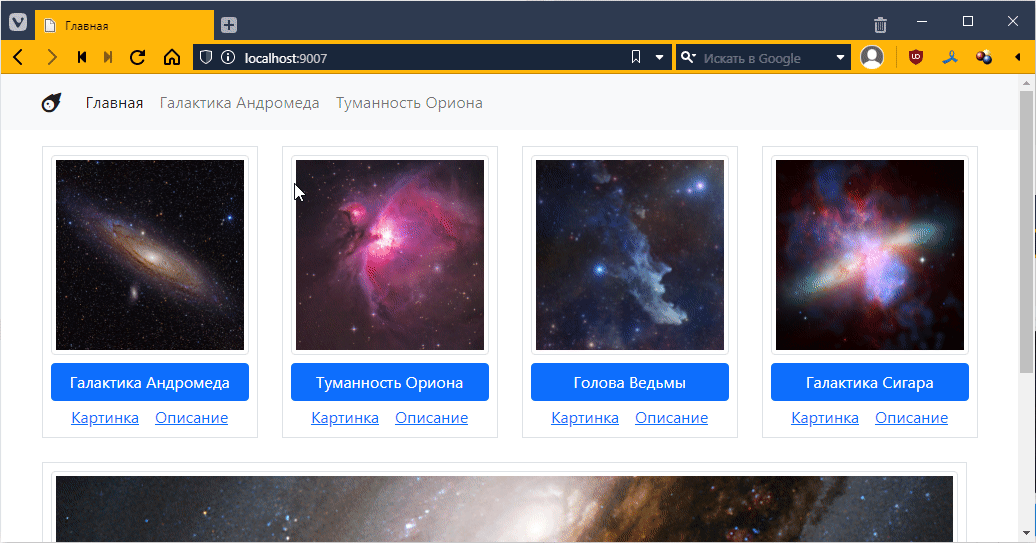
Let’s take a look at the links. Let’s start with the big blue button, which should open a page with general information about the object.
Previously, we had a separate controller and a separate template for each page. Specifically, AndromedaController.php and OrionController.php.
Well, when there are only two objects, this works fine in principle.
But if you are working with a database, you may have a lot of objects, and even our five objects already make you think about the feasibility of this approach.
So what should we do?
We simply create one template and one controller, within which we decide which object to display. As for how to determine which object to display, the ability to set a URL template comes in handy here.
For example, now when we want to go to the Andromeda page, we use the URL /andromeda, and if we want to see Orion, we go to /orion. Now we have more objects, and there aren’t enough names for all of them (although there are ways around that, of course).
Therefore, we can use a more universal approach. Each object has a unique number, which is stored in the id field.
We can use it instead of an explicit name in the link and go to the Andromeda Galaxy, for example, at /space-object/1, or to the Cigar Galaxy at /space-object/4. This gives us a template like this:
/space-object/{id}
where id is the object identifier. In order to match the template with the URL, we need to use a regular expression again.
Using a regular expression, we can describe this template as follows:
/space-object/\d+
\d+ means one or more consecutive digits (i.e., essentially any number).
This expression will match combinations such as
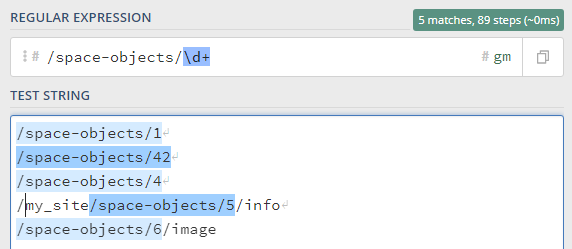
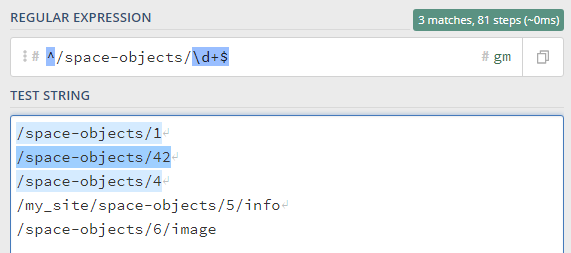
which is almost right, but I still want the entire string to be checked, so I will add the start ^ and end $ characters to the regular expression, like this:
^/space-object/\d+$
then only the first 3 strings will match
And I also want to somehow access the number itself.
To do this, you can mark a piece of the template with round brackets in the regular expression, and then you will be able to access the text in the selected block. We make the regular expression like this:
^/space-objects/(\d+)$
and see how the system recognizes it:
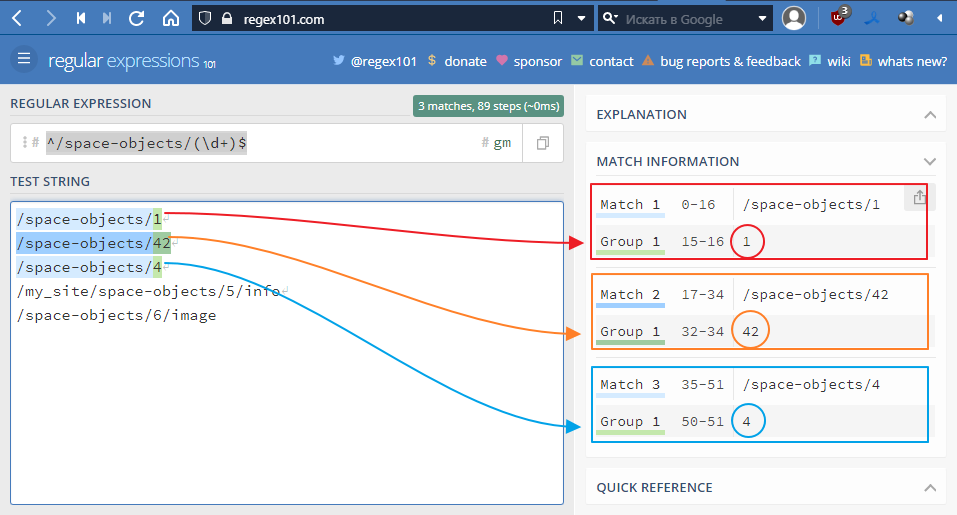
Basically, that’s what we need. Let’s try to implement it, but first
Go to index.php and delete everything from the router:
<?php
// ...

// leave only the main page
if ($url == "/") {
    $controller = new MainController($twig);
}

// ...
I want my router to become a separate class. To which you can add URLs and their corresponding controllers. And the router, being a class itself, will decide which controller to choose for the current URL.
But we need to figure out where to put this class.
Since what we are essentially doing is creating a microframework, let’s create a framework folder. And move BaseController.php and TwigBaseController.php into it
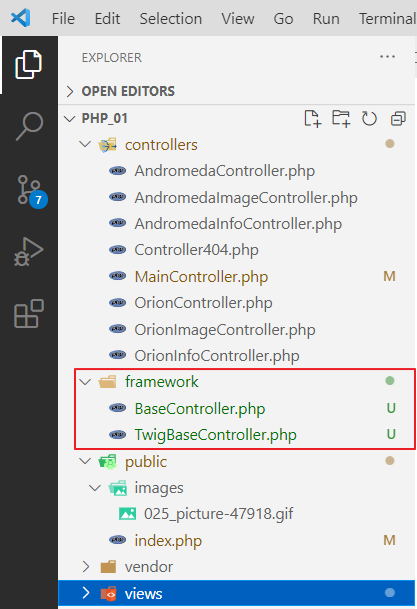
Now let’s create a file called autoload.php so that we don’t have to manually write the paths to these files. We write the following in it
<?php

spl_autoload_register(function($class) {
    $fn = __DIR__ . "\\" . $class . '.php';
    if (file_exists($fn)) {
        require_once $fn;
    }
});
The idea behind this file is as follows: it uses a special function called spl_autoload_register, which registers a function that will be called when the PHP code mentions a class that has not been explicitly imported.
In fact, every time there is a reference to such an unknown class, the function
function($class) {
    $fn = __DIR__ . "\\" . $class . ".php";
    if (file_exists($fn)) {
        require_once $fn;
    }
}
The function forms the absolute path to the file, i.e., the class name, for example, TwigBaseController, is passed to $class,
and __DIR__ is the path to the folder where autoload.php is located
In PHP, you can concatenate strings using a dot, i.e. __DIR__ . "\\" . $class . ".php"; will give us the absolute path to the file TwigBaseController.php, something like C:\Users\m\Desktop\php_01\framework\TwigBaseController.php
Next, we check if such a file exists, and if it does, we connect it.
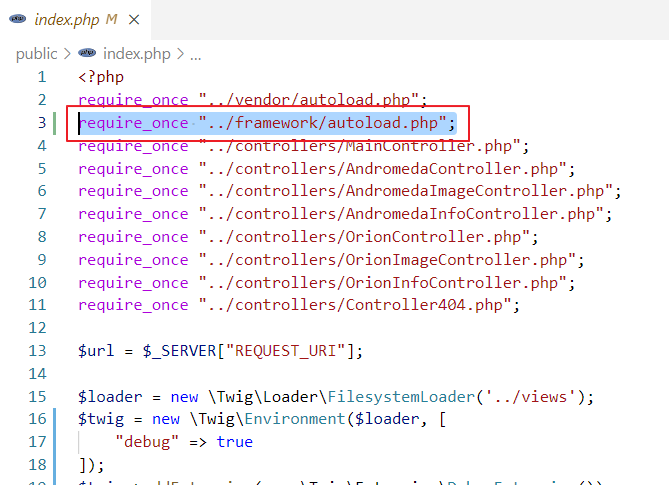
Now we need to remove require_once from TwigBaseController everywhere
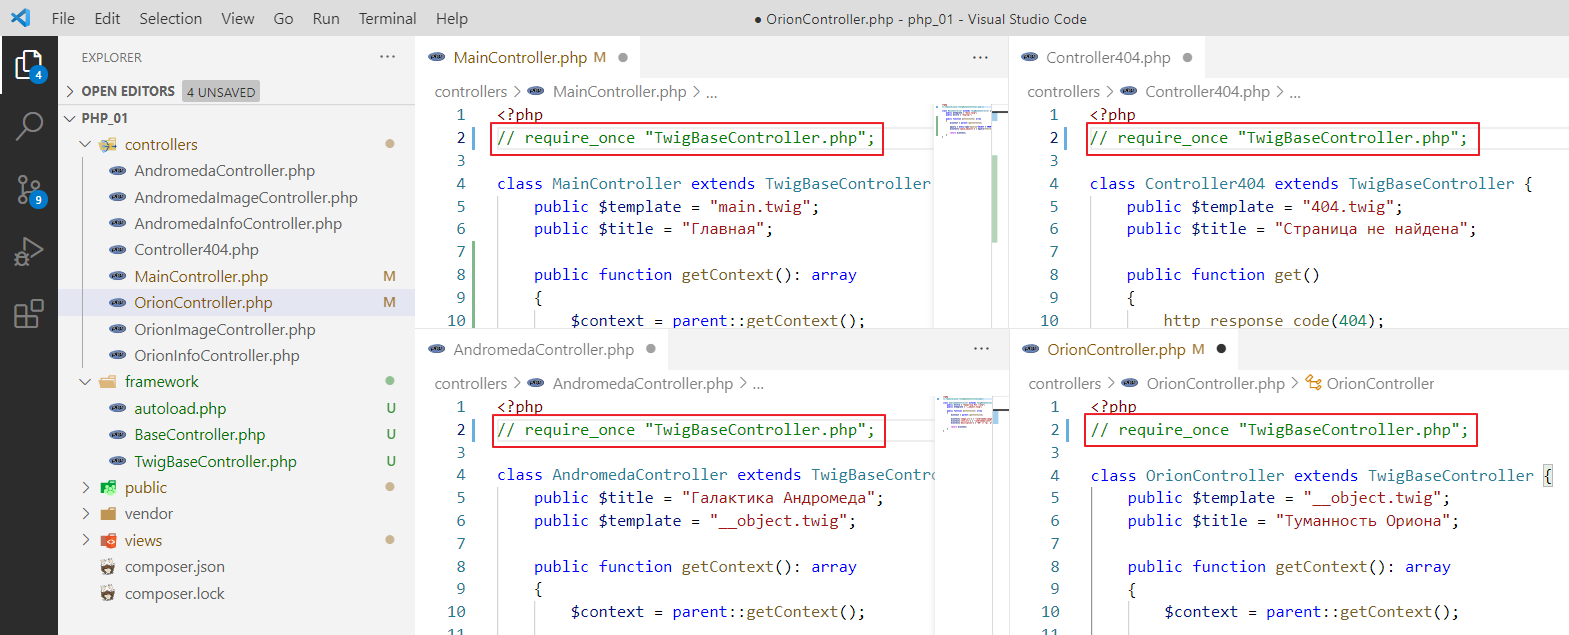
and add autoload to index.php
In theory, if we run it, the main page should work as usual:

Create a file named Router.php in the framework folder.
And write the following in it:
<?php

// First, let's create a class for a single route.
class Route {
    public string $route_regexp; // here we get the url template
    public $controller; // and this is the controller class

    // well, just a constructor
    public function __construct($route_regexp, $controller)
    {
        $this->route_regexp = $route_regexp;
        $this->controller = $controller;
    }
}
Now the router itself:
<?php
class Route {
// ...
}
class Router {
/**
* @var Route[]
*/
protected $routes = []; // create a field -- a list of routes and controllers associated with them
protected $twig; // variables for twig and pdo
protected $pdo;
// constructor
public function __construct($twig, $pdo)
{
$this->twig = $twig;
$this->pdo = $pdo;
}
// function used to add a route
public function add($route_regexp, $controller) {
// essentially just pushes the route with the associated controller into $routes
array_push($this->routes, new Route($route_regexp, $controller));
}
// function that should find the route by URL and call its get function
// if the route is not found, the default controller will be used
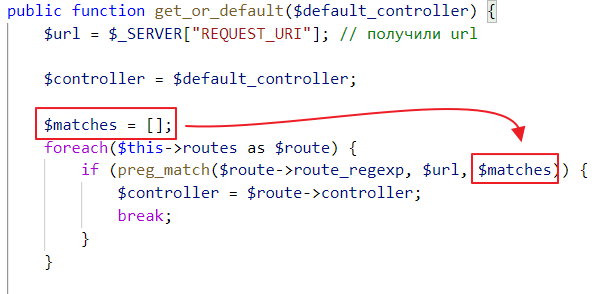
public function get_or_default($default_controller) {
$url = $_SERVER["REQUEST_URI"]; // got the URL
// set it in the $default_controller controller
$controller = $default_controller;
// go through the $routes list
foreach($this->routes as $route) {
// check if the route matches the template
if (preg_match($route->route_regexp, $url)) {
// if it matches, set the controller associated with the template
$controller = $route->controller;
// and exit the loop
break;
}
}
// create a controller instance
$controllerInstance = new $controller();
// pass pdo to it
$controllerInstance->setPDO($this->pdo);
// call
return $controllerInstance->get();
}
}
It’s not entirely clear how to pass twig here, since in TwigBaseController.php it was passed through the constructor.
Let’s go to TwigBaseController.php and pass it through the setter as well:
<?php
require_once "BaseController.php";

class TwigBaseController extends BaseController {
    public $title = "";
    public $template = "";
    protected \Twig\Environment $twig;

    // remove
    // public function __construct($twig)
    // {
    //     $this->twig = $twig;
    // }

    // add
    public function setTwig($twig) {
        $this->twig = $twig;
    }

    public function getContext() : array
    {
        // ...
    }

    public function get() {
        // ...
    }
}
Return to Router and add the following:
class Router {
    // ...

    public function get_or_default($default_controller) {
        // ...

        $controllerInstance = new $controller();
        $controllerInstance->setPDO($this->pdo);

        // check if controllerInstance is a descendant of TwigBaseController
        // and if it is, pass twig to it
        if ($controllerInstance instanceof TwigBaseController) {
            $controllerInstance->setTwig($this->twig);
        }

        // call
        return $controllerInstance->get();
    }
}
Here again, we clear out a lot of stuff and write:
<?php
// ...
require_once "../controllers/Controller404.php";

// $url = $_SERVER["REQUEST_URI"]; REMOVE

$loader = new \Twig\Loader\FilesystemLoader("../views");
$twig = new \Twig\Environment($loader, [
    "debug" => true
]);
$twig->addExtension(new \Twig\Extension\DebugExtension());

// $controller = new Controller404($twig); REMOVE

$pdo = new PDO("mysql:host=localhost;dbname=outer_space;charset=utf8", "root", "");

$router = new Router($twig, $pdo);
$router->add("#/#", MainController::class);
$router->get_or_default(Controller404::class);

/*remove
if ($url == "/") {
    $controller = new MainController($twig);
}

if ($controller) {
    $controller->setPDO($pdo);
    $controller->get();
}
*/
It will remain like this:
<?php
// ...
require_once "../controllers/Controller404.php";

$loader = new \Twig\Loader\FilesystemLoader("../views");
$twig = new \Twig\Environment($loader, [
    "debug" => true
]);
$twig->addExtension(new \Twig\Extension\DebugExtension());

$pdo = new PDO("mysql:host=localhost;dbname=outer_space;charset=utf8", "root", "");

$router = new Router($twig, $pdo);
$router->add("#/#", MainController::class);
$router->get_or_default(Controller404::class);
Let’s test it.

Beautiful! =)
Let’s try adding another URL:
<?php
// ...

$router = new Router($twig, $pdo);
$router->add("#/#", MainController::class);
$router->add("#/andromeda#", AndromedaController::class);

$router->get_or_default(Controller404::class);
Let’s test it:

It doesn’t work…
Ah! There’s a problem with the order again, it finds the first one it comes across. Let’s make it so that it always searches for a template with a full match. In theory, we should write it like this:
$router = new Router($twig, $pdo);
$router->add("#^/$#", MainController::class);
$router->add("#^/andromeda$#", AndromedaController::class);
Then it starts working:
It seems fine, but you have to constantly write #^ at the beginning and $# at the end. Let’s make it automatically added to add. Go to Router.php and tweak it there:
class Router {
    // ...

    public function add($route_regexp, $controller) {
        // wrapped it in #^ and $# here
        array_push($this->routes, new Route("#^$route_regexp$#", $controller));
    }
and now in index.php we leave it like this:
$router = new Router($twig, $pdo);
$router->add("/", MainController::class);
$router->add("/andromeda", AndromedaController::class);
This makes it much easier to read and write.
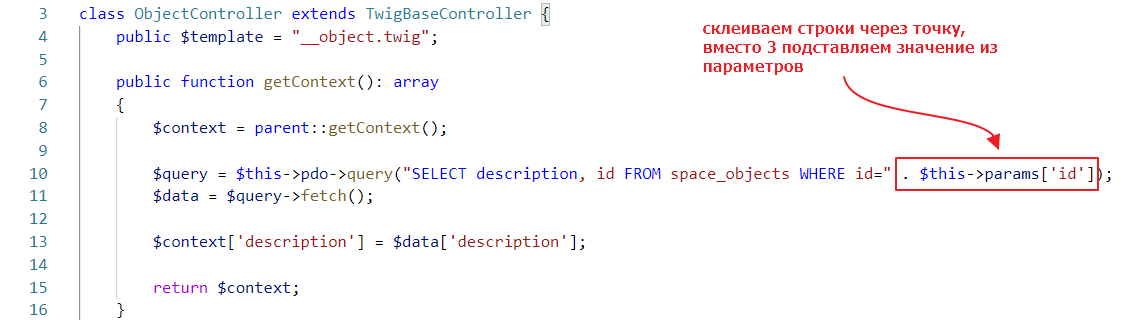
Go to the controllers folder and create a file called ObjectController.php and put the twig controller template in it.
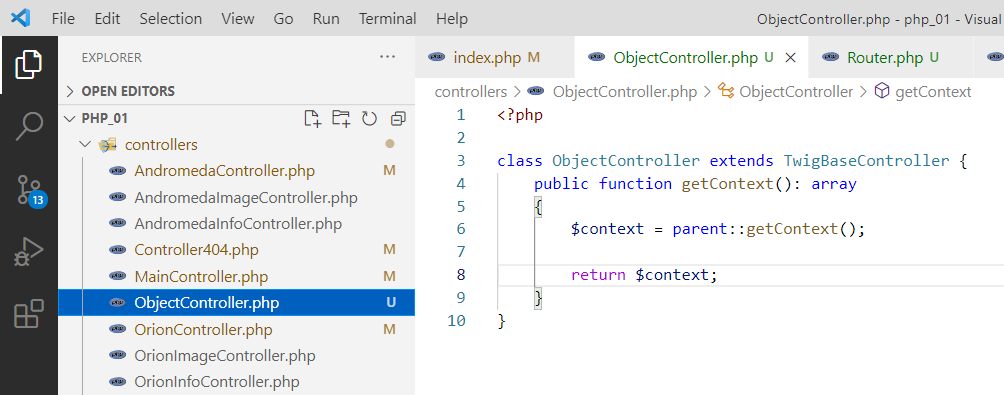
Look, we already have a template for the object, all that’s left is to get the data from the database.
<?php

class ObjectController extends TwigBaseController {
    public $template = "__object.twig"; // specify the template

    public function getContext(): array
    {
        $context = parent::getContext();

        // prepare a query to the database, let's say we'll pull the record with id=3
        // here I specify specific fields, it's more logical there
        $query = $this->pdo->query("SELECT description, id FROM space_objects WHERE id=3");
        // pull one row from the database
        $data = $query->fetch();

        // transfer the description from the database to the context
        $context["description"] = $data["description"];

        return $context;
    }
}
Now let’s connect this controller to the router in index.php:
<?php
require_once "../vendor/autoload.php";
require_once "../framework/autoload.php";
require_once "../controllers/MainController.php";
require_once "../controllers/ObjectController.php"; // added
// ...

$router = new Router($twig, $pdo);
$router->add("/", MainController::class);
$router->add("/andromeda", AndromedaController::class);
// remember our regular expression that we created above, we put it here
$router->add("/space-object/(\d+)", ObjectController::class);

$router->get_or_default(Controller404::class);
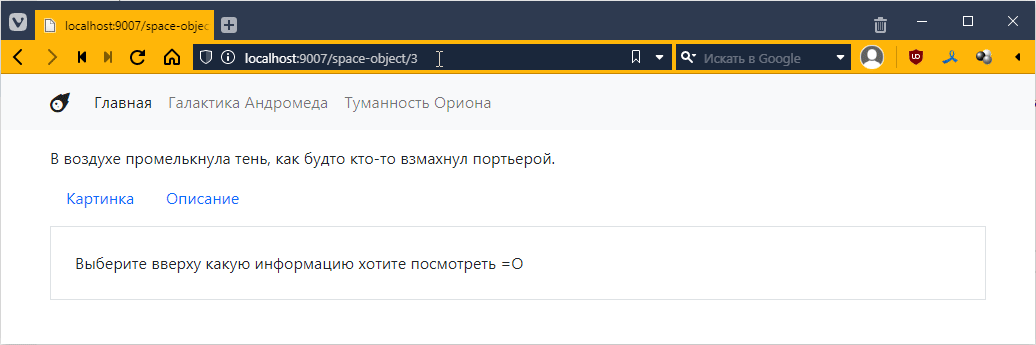
Now let’s try to open the link with space-object. I have http://localhost:9007/space-object/3
Let’s look in the browser:
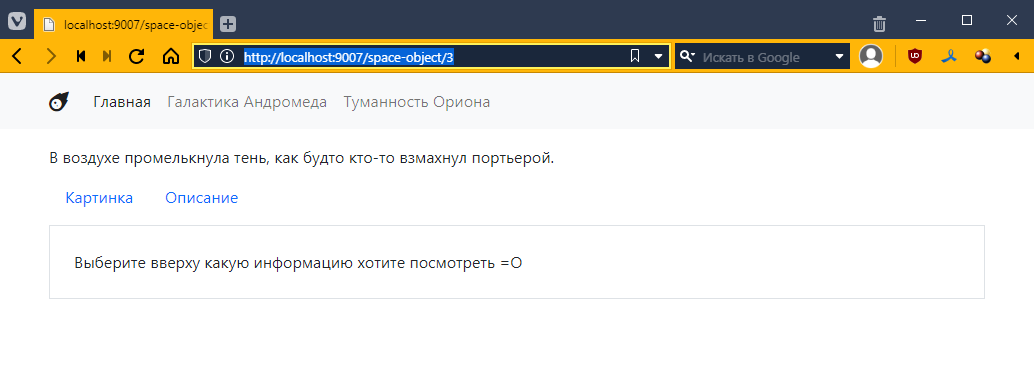
And then in phpMyAdmin
Well, it seems to have caught on =)
Now let’s try with another id, for example: http://localhost:9007/space-object/1
Well, it displays the same thing. That means we need to somehow pass this identifier to the controller.
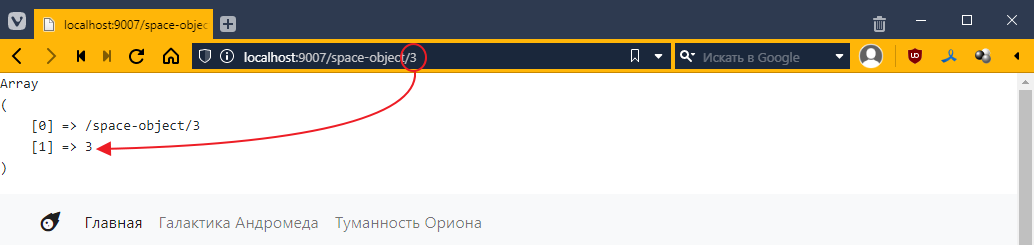
Go to Router.php and add the matches variable like this:
The idea behind this variable is as follows: when you have parentheses in the regular expression /space-object/(\d+), the part of the string that matches what is in the parentheses will go into matches, i.e. if you only have one set of parentheses, the value will go as the second element of the array matches[1].
So, if we have the string /space-object/42, then
matches[0] will be /space-object/42,matches[1] will be 42If we had /space-object/(\d+)/(\w+) and a URL like /space-object/42/andromeda, then
matches[0] would be /space-object/42/andromeda,matches[1] would be 42,matches[2] would be andromeda.We need to pass this matches to the controller. Let’s go to BaseController and add the params field:
<?php

abstract class BaseController {
    public PDO $pdo;
    public array $params; // added field

    // added setter
    public function setParams(array $params) {
        $this->params = $params;
    }

    // ...
}
And then we call this function in Router.php
public function get_or_default($default_controller) {
    // ...

    $controllerInstance = new $controller();
    $controllerInstance->setPDO($this->pdo);
    $controllerInstance->setParams($matches); // pass parameters

    if ($controllerInstance instanceof TwigBaseController) {
        $controllerInstance->setTwig($this->twig);
    }

    return $controllerInstance->get();
}
Now let’s see what happens when the getContext method is called. Go to ObjectController and insert the following there:
<?php

class ObjectController extends TwigBaseController {
    public $template = "__object.twig";

    public function getContext(): array
    {
        $context = parent::getContext();

        // added params output
        echo "<pre>";
        print_r($this->params);
        echo "</pre>";

        // ...

        return $context;
    }
}
Let’s see
As I promised, $this->params turned out to be a number from the request.
By the way, in regular expressions, you can add a name to a subexpression. To do this, add ?P<param_name> after the opening parenthesis, like this
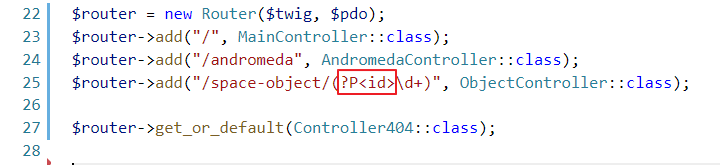
Now, if we reload the page, we will see that an additional key has appeared in the dictionary:
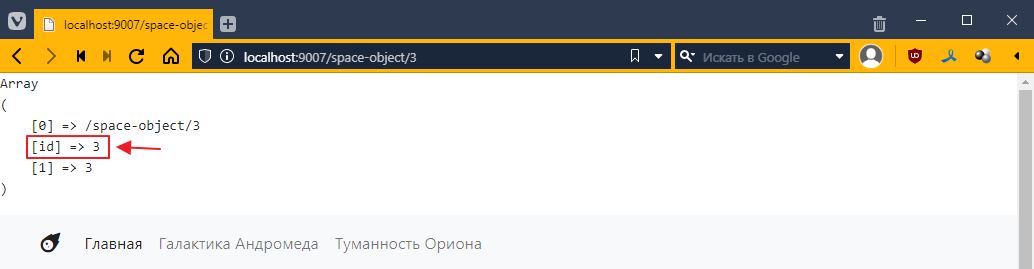
Let’s use this parameter now.
Let’s try it:
Incredible! =О
We are now forming a query by simply concatenating strings. This is potentially a security hole because if, for some reason, we create a flawed regular expression, a potential attacker could substitute any expression for the number, including a database query.
Here’s an example. Let’s say we made this regular expression
$router->add("/space-object/(?P<id>.*)", ObjectController::class);
.* means a set of characters of any length. This is often used when you need to display some arbitrary name to make the URL more readable.
The request http://localhost:9007/space-object/1 will work as usual:
But now some bad guy comes along and writes

and suddenly you have a double query inside:
SELECT description, id FROM space_objects WHERE id=1; UPDATE space_objects SET title = title + "1" WHERE id = 3;
and if we somehow mess up the data, it may result in data being updated or even deleted. This type of attack is called SQL Injection.
Therefore, when you form a query, you should never use simple string concatenation. The creators of PDO are aware of this and therefore offer an alternative way to pass parameters. It is used as follows:
// create a query, create a variable my_id in the query for the parameter
$query = $this->pdo->prepare("SELECT description, id FROM space_objects WHERE id= :my_id");
// bind the value to my_id
$query->bindValue("my_id", $this->params["id"]);
$query->execute(); // execute the query

// retrieve data
$data = $query->fetch();
It will work the same way:
Go to main.twig and replace the hrefs there
and try it out
In addition to the main part of the address, such as http://localhost:9007/space-object/1, URLs often contain additional elements that are added at the end after the question mark:
http://localhost:9007/space-object/1?sort=title&filter=Галактика
These are called GET parameters. They are a set of keys and values separated by an ampersand &
They are usually used to refine the behavior of the base request, for sorting, filtering, etc.
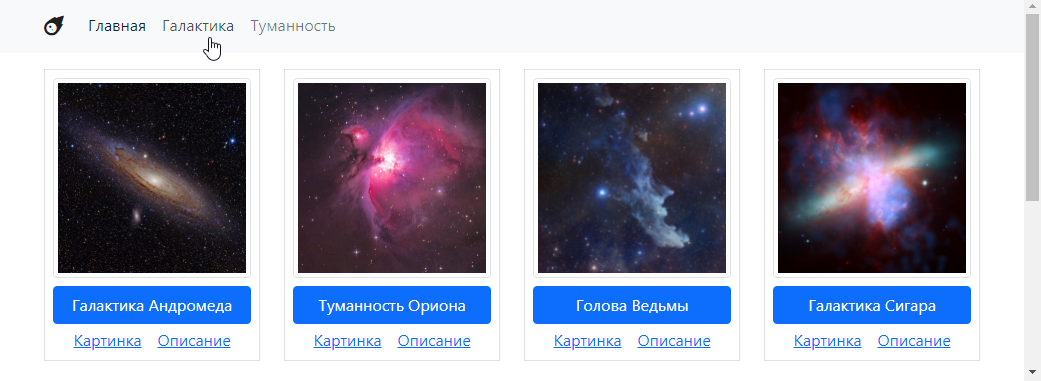
We don’t have top navigation enabled right now. More precisely, there are some items there, but they don’t work anymore.
Let’s use it to select the types of objects I want to see. For example, I have nebulae and galaxies. I want to make it so that clicking on one link shows nebulae, and clicking on another link shows galaxies.
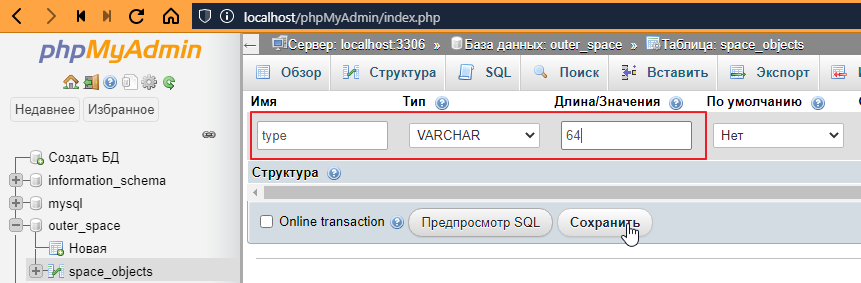
But first, we need to prepare the data. Let’s add a field to the database that will indicate the group to which the object belongs.
Go to phpMyAdmin and add a field
I’ll call it type
Now we need to fill it in for all objects. To fill it in quickly, you can simply double-click on the field and enter the values:
Now we need to make sure that when the navigation bar is generated, a list of possible types is displayed. Since the menu should be present on all pages, there are two ways to do this: the correct way and the quick way =)
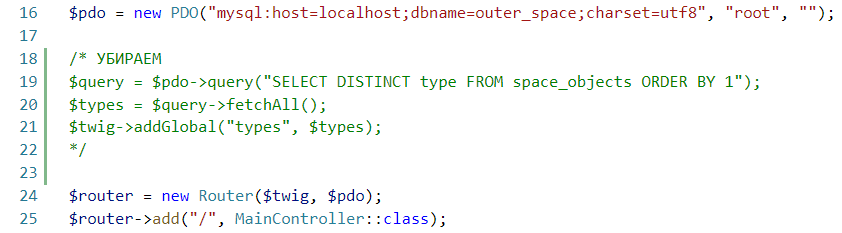
The idea is simple: in Twig, we can define a variable that will be available from any template. To do this, we need to do the following in index.php
// ...
$twig->addExtension(new \Twig\Extension\DebugExtension());

$pdo = new PDO("mysql:host=localhost;dbname=outer_space;charset=utf8", "root", "");

// create a database query
$query = $pdo->query("SELECT DISTINCT type FROM space_objects ORDER BY 1");
// fetch data
$types = $query->fetchAll();
// create a global variable in $twig that will be accessible from any template
$twig->addGlobal("types", $types);

$router = new Router($twig, $pdo);
// ...
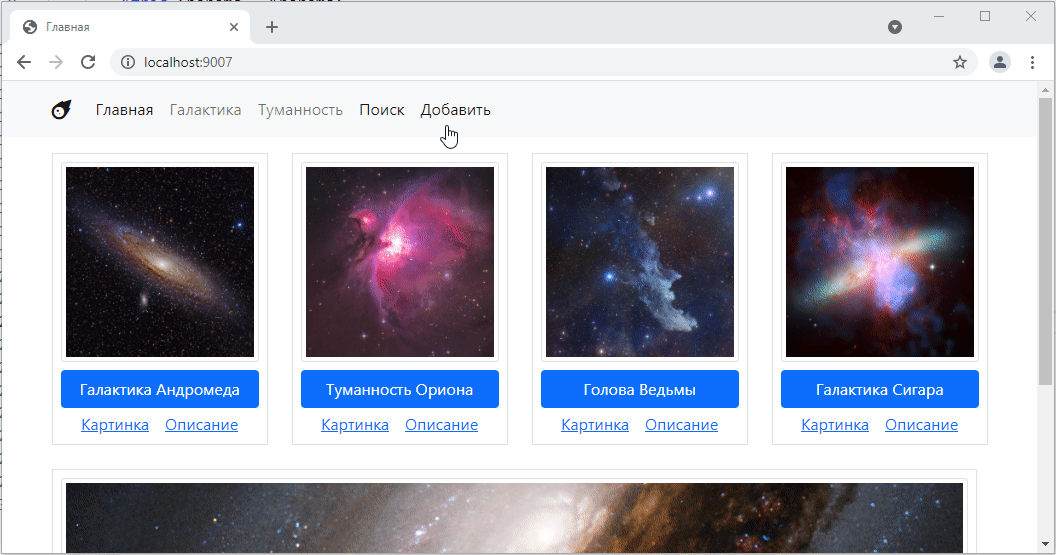
Now you can go to the base template __layout.twig and add a loop for types there:
<!DOCTYPE html>
<html lang="en">
<head>
    <!-- ... -->
</head>
<body>
    <nav class="navbar navbar-expand-lg navbar-light bg-light">
        <div class="container">
            <a class="navbar-brand" href=""#><i class="fas fa-meteor"></i></i></a>
            <button class="navbar-toggler" type="button" data-bs-toggle="collapse" data-bs-target="#navbarNav" aria-controls="navbarNav" aria-expanded="false" aria-label="Toggle navigation">
            <span class="navbar-toggler-icon"></span>
            </button>
            <div class="collapse navbar-collapse" id="navbarNav">
            <ul class="navbar-nav">
                <!-- Left a link to the home page -->
                <li class="nav-item">
                <a class="nav-link active" aria-current="page" href="/">Home</a>
                </li>
                <!-- replaced the rest with a cycle by type -->
                {% for type in types %}
                    <li class="nav-item">
                        <!-- type.type -- outputs the type,
                               and adding |title makes the first letter of the word capitalized -->
                        <a class="nav-link" href=""#>{{ type.type|title }}</a>
                    </li>
                {% endfor %}
            </ul>
            </div>
        </div>
    </nav>
    <div class="container pt-3 pb-3">
        {% block content %}
        {% endblock %}
    </div>
</body>
</html>
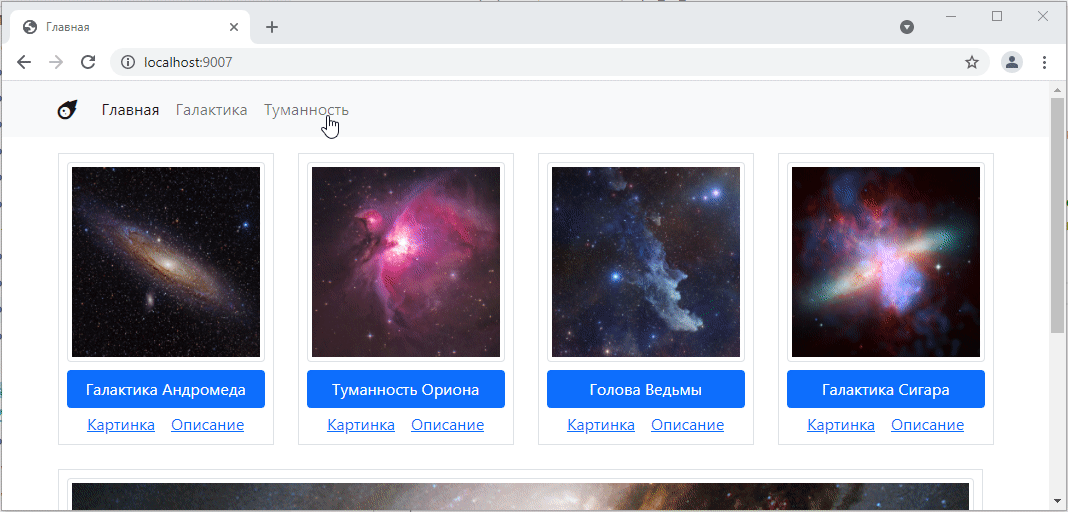
Let’s take a look:
That is, the values from the database are linked, but the links are not working yet.
What’s wrong with this approach? From a template perspective, everything is fine. But from a code perspective, not so much. Our index.php is the entry point of the application, which manages high-level stuff, the router, package connections, database connections, template generator activation, and basically ties everything together.
And this attempt to make a request to the database and pass something to twig looks like we’re blowing a whistle at a symphony concert. In general, it’s inappropriate, plus it’s impossible to test.
Therefore
So, the more correct approach is to create a base controller for our application (not a framework—ideally, a framework should be independent of the project theme) and have all other controllers inherit from it.
Let’s do that. Create a file, I’ll call it BaseSpaceTwigController.php, and put the code that was in index.php into it, but with a few minor changes.
And remove this from index.php.
and replace TwigBaseController with BaseSpaceTwigController everywhere.
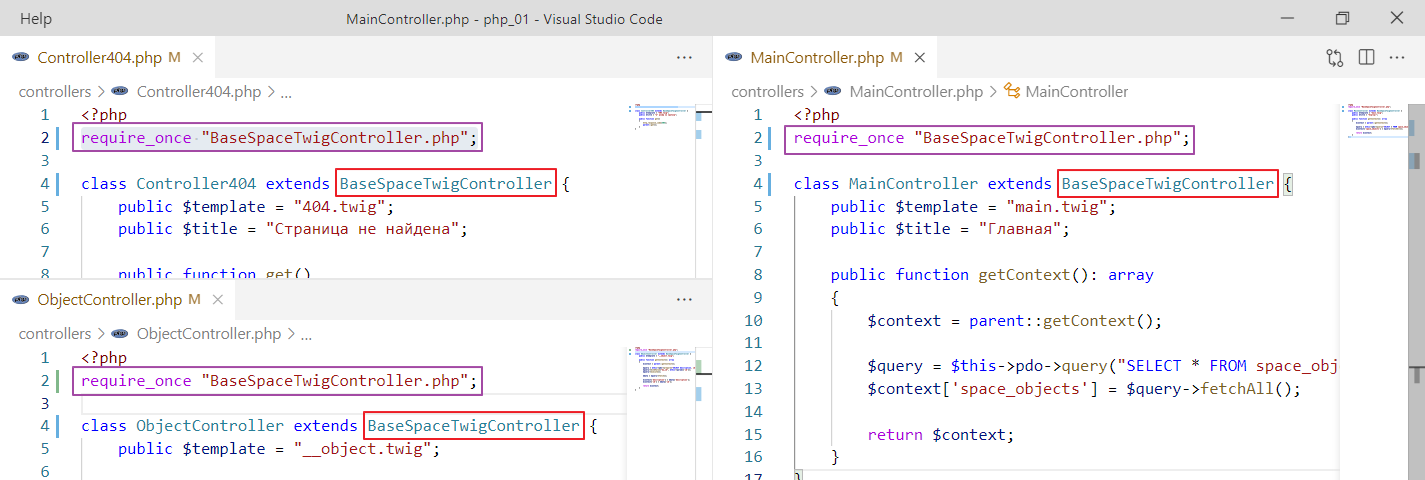
It works the same way.
But it’s more architecturally sound.
Now I want to make it so that clicking on a navigation element triggers the same controller. But I want it to understand that I only want to see objects of a specific type.
How can I do this?
To do this, we need to add query parameters to the link leading to the home page. This is done as follows. Go to __layout.twig and add parameters to the href of the navigation elements:
{% for type in types %}
    <li class="nav-item">
        <!-- added href="/?type={{ type.type }}" -->
        <a class="nav-link" href="/?type={{ type.type }}">{{ type.type|title }}</a>
    </li>
{% endfor %}
Let’s see how it looks
That is, the part responsible for the parameters appears in the request, but for some reason the router stops recognizing the path.
Why is this happening?
To understand, let’s add the output $_SERVER["REQUEST_URI"] to the router.
class Router {
    // ...

    public function get_or_default($default_controller) {
        $url = $_SERVER["REQUEST_URI"];
        print_r($url); // added output
        // ...
    }
    // ...
}
Let’s look at the page
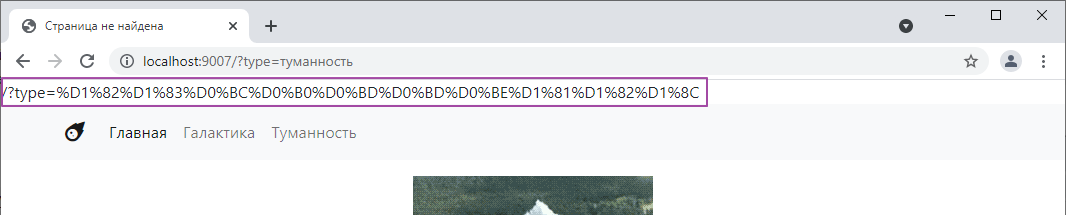
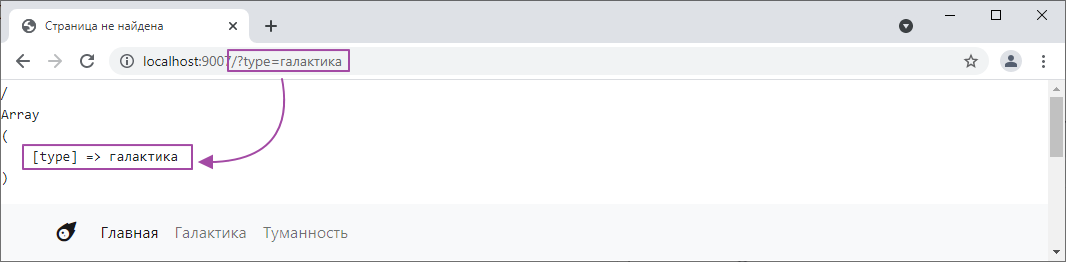
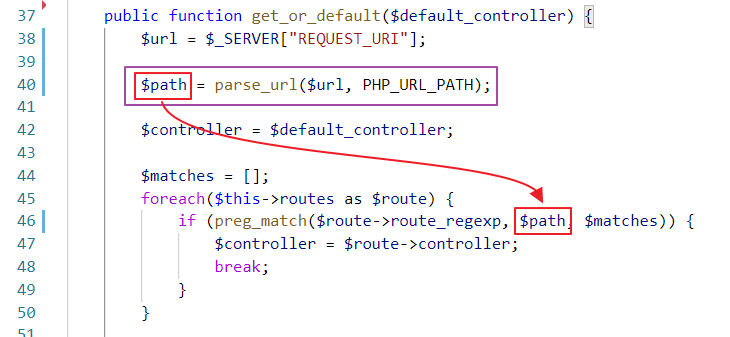
That is, PHP does not separate the address itself from the address parameters for us. Fortunately, there is a function that can do this. It is called parse_url — it knows how to extract various separate pieces from a URL string, such as the scheme, website address, full address, and other elements, which are actually quite numerous. Let’s check how it works^
public function get_or_default($default_controller) {
    $url = $_SERVER["REQUEST_URI"];

    $path = parse_url($url, PHP_URL_PATH); // вытаскиваем адрес
    echo $path; // выводим

    // ...
}
Oh, how:

But besides the address itself, we also need parameters.
And with parameters, everything is simpler. The set of parameters in the address bar is called GET request parameters, and they are accessible through a special variable $_GET. Let’s take a look:
public function get_or_default($default_controller) {
    $url = $_SERVER["REQUEST_URI"];

    $path = parse_url($url, PHP_URL_PATH);
    echo $path;

    echo "<pre>"; // for a nicer display
    print_r($_GET); // display the contents of $_GET
    echo "</pre>";
    // ...
}
Let’s see:
We can add a couple more parameters using &, for example, [http://localhost:9007/?type=галактика&sort=123&my_array[0]=c&my_array[1]=b] (http://localhost:9007/?type=галактика&sort=123&my_array[0]=c&my_array[1]=b) and see what happens:
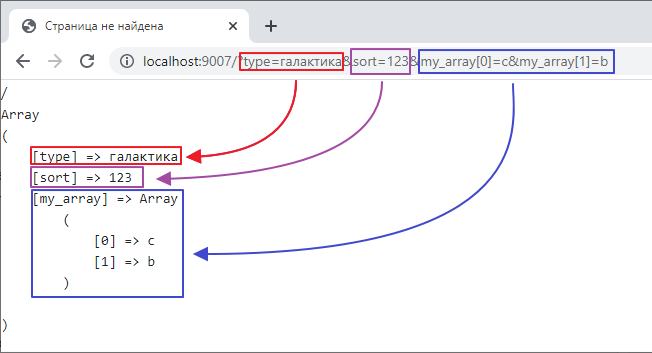
In other words, this $_GET stores the parameters from the address bar in a convenient form.
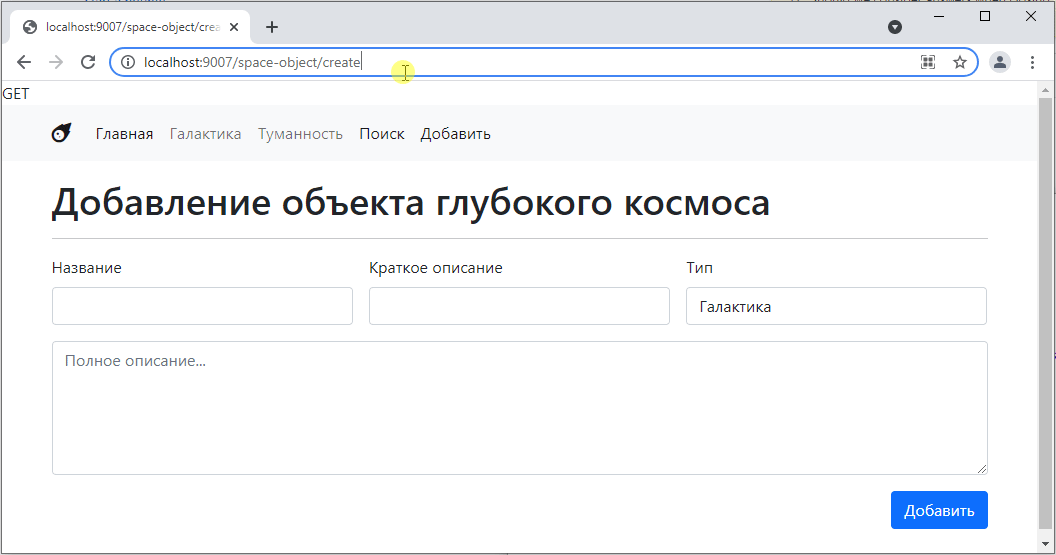
So let’s first fix the router so that it ignores the parameters and only tests the address itself for a match, like this:
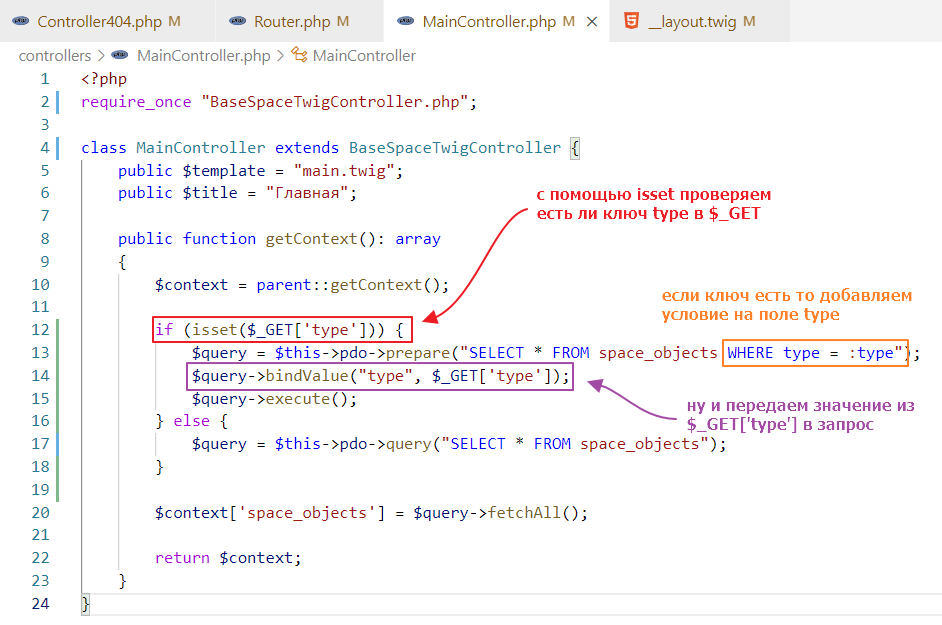
Now let’s go to MainController and make the following changes:
and test it:
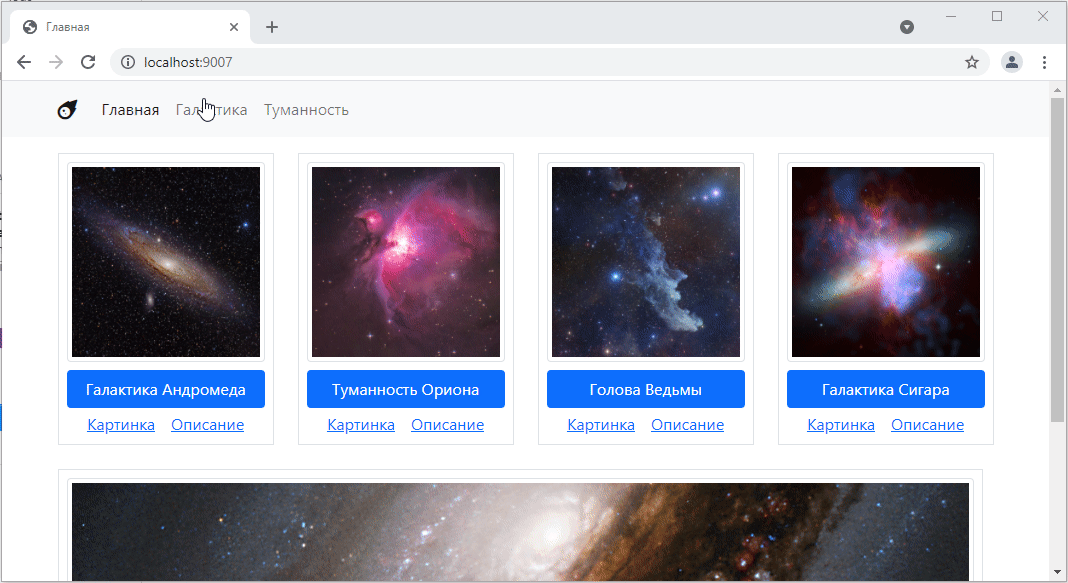
Great! =)
Now let’s learn how to work with forms.
A form is a special block on a page that can contain various input fields, drop-down lists, checkboxes, and other unknown things. It can be used for two things:
Now let’s look at forms in terms of implementing a complex filter.
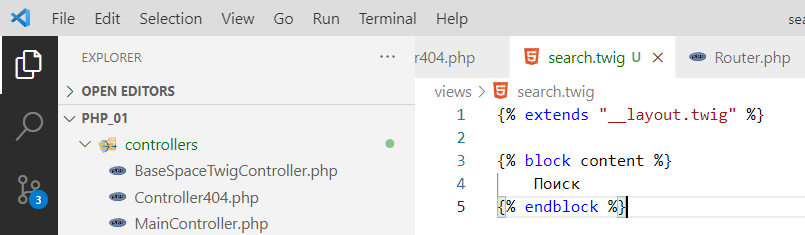
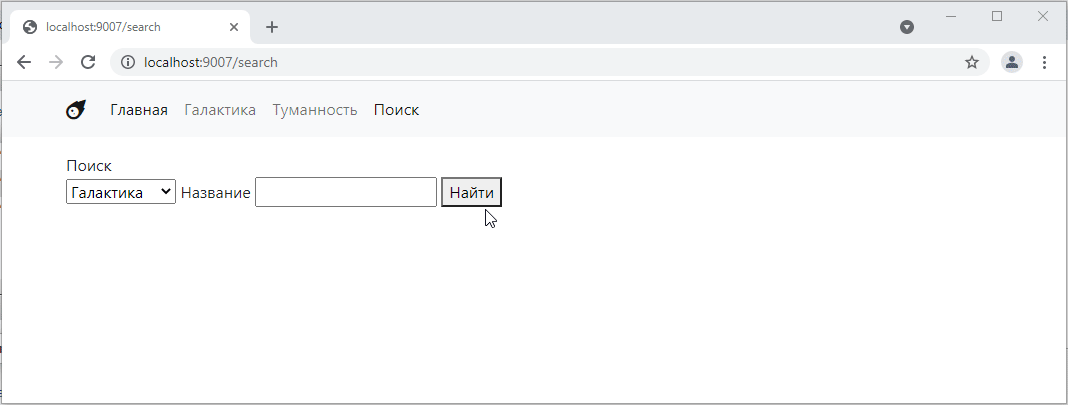
So, let’s make a page for searching our database. We will need SearchController
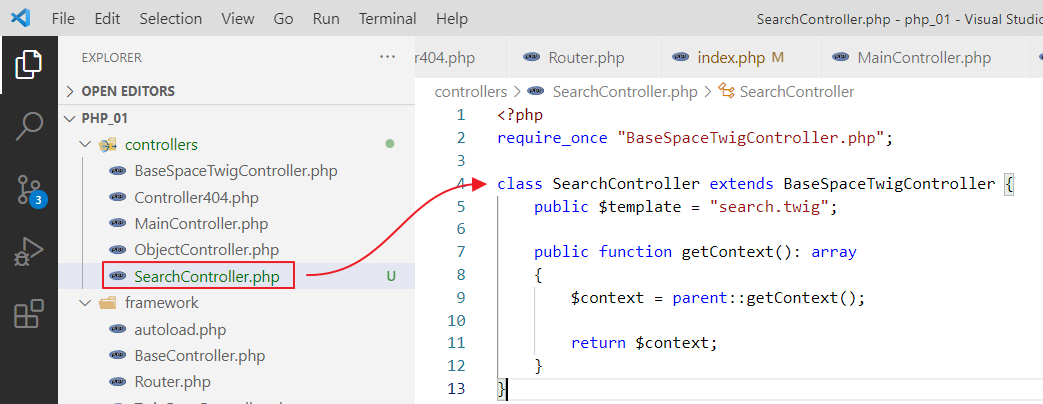
and a template:
We will also link it in index.php
$router->add("/search", SearchController::class);
and add a link to the navigation bar
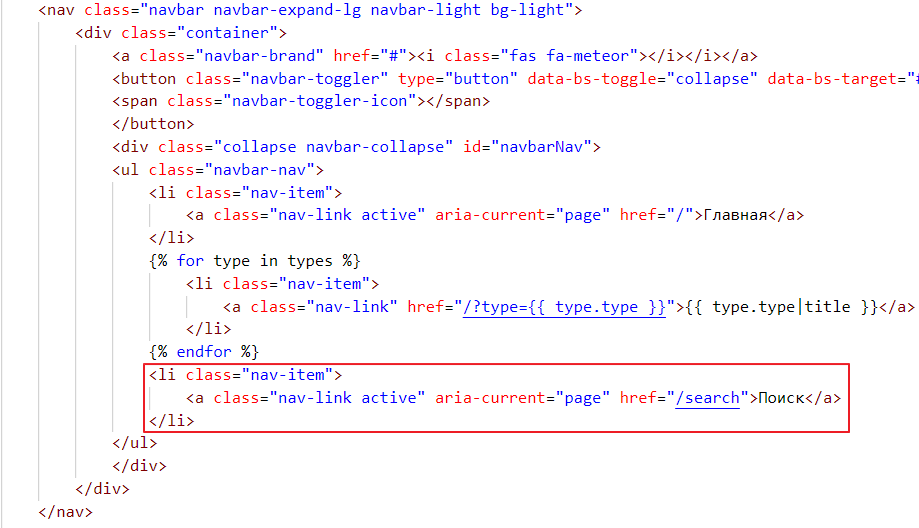
check
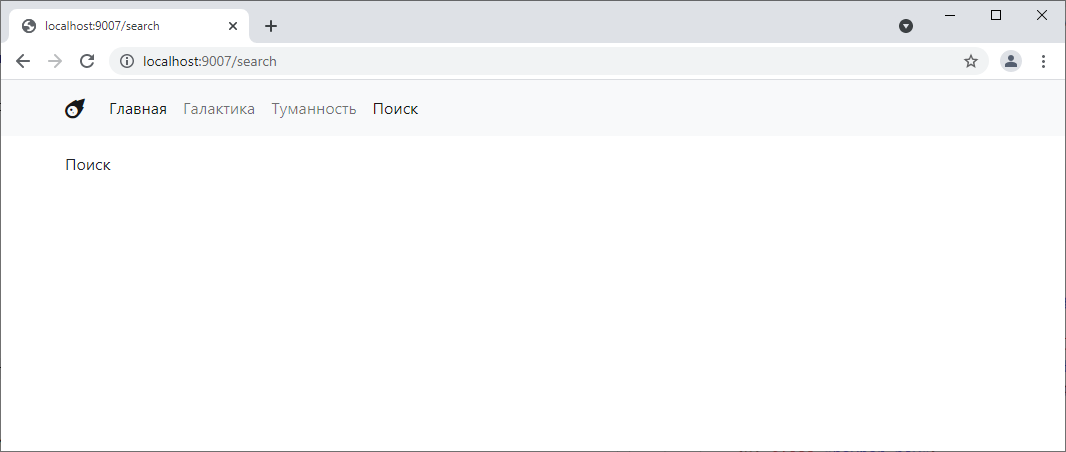
Woo-hoo! =)
Let’s start with what we’ve already done, searching by type. Last time, we basically just created links for filtering by type and did it manually. We added parameters there using a question mark, and that was it…
But now we’re going to take a different approach. We’ll create a form with a drop-down list and a search button.
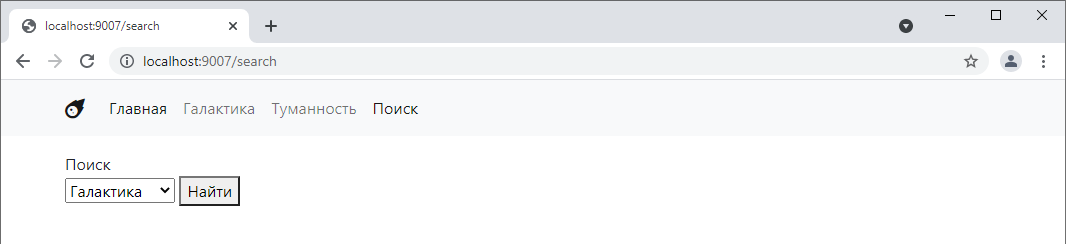
Go to search.twig and write there:
{% extends "__layout.twig" %}

{% block content %}
    Search

    <form action="">
        <select name="type">
            <option value="galaxy">Galaxy</option>
            <option value="nebula">Nebula</option>
        </select>

        <button type="submit">Find</button>
    </form>

{% endblock %}
Let’s see how it looks:
Now let’s try switching the menu item and clicking “Find.”
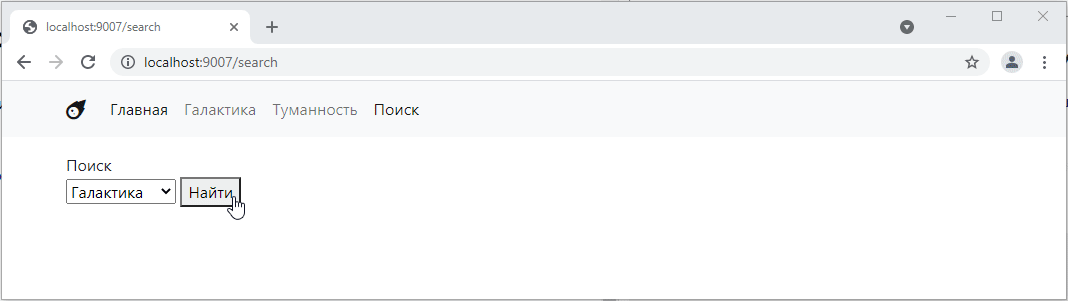
OOH!! As you can see, when we click the button, the page reloads, and the value selected on the form is passed to the get parameters. This means we no longer need to write anything manually =O
By the way, if we specify, for example, not type in the select name, but some other word, such as object_type, then it will be used as the key in the get parameter. Well, the value attribute from the selected option tag will be used as the value.

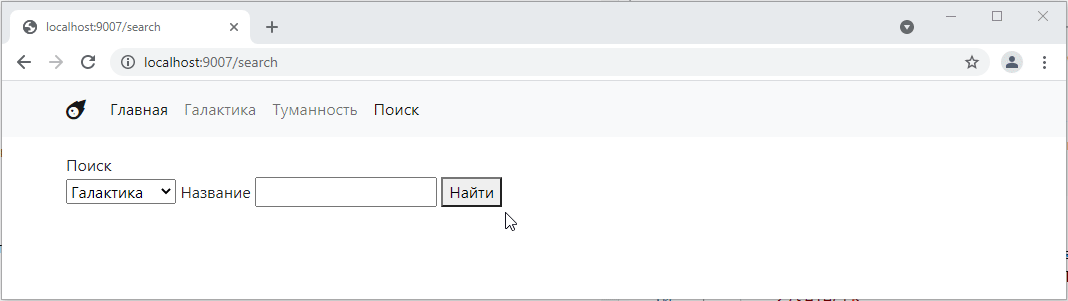
Let’s add another field to our form, for example, to search by name
<form action="">
    <select name="object_type">
        <option value="galaxy">Galaxy</option>
        <option value="nebula">Nebula</option>
    </select>
    <label>Name <input type="text" name="title"></label>

    <button type="submit">Find</button>
</form>
Let’s test it.
That is, if we have several fields, they are combined in the parameters at the top using the ampersand symbol.
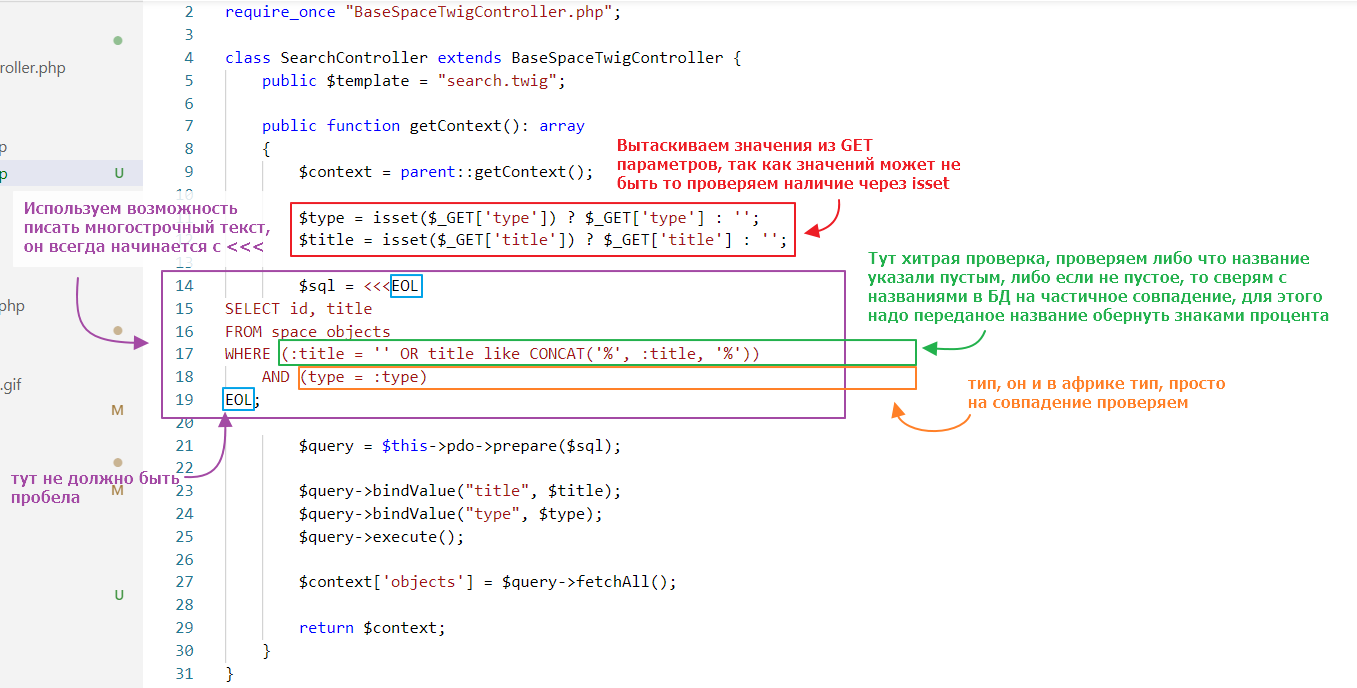
In general, I think the principle is clear. Now let’s refine it so that our search starts working properly and displays a list of links to objects that meet the condition.
It’s a little complicated, but I think you can figure it out:
Let’s see how it works:
Hooray! =)
Finally, we have arrived at POST requests. Unlike GET requests, whose information (key-values) is visible in the address bar, POST request data is encrypted in the request body.
Also, POST request data does not appear in the nginx server logs. This reduces the likelihood of a potential attacker obtaining the data. GET requests, on the other hand, are visible in the logs in their raw form.
For example, you can look at the nginx log in Laragon like this:
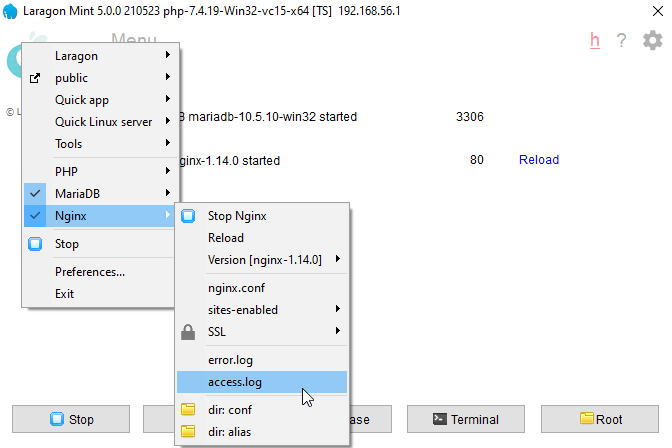
and see the requests we made when we used the search function:
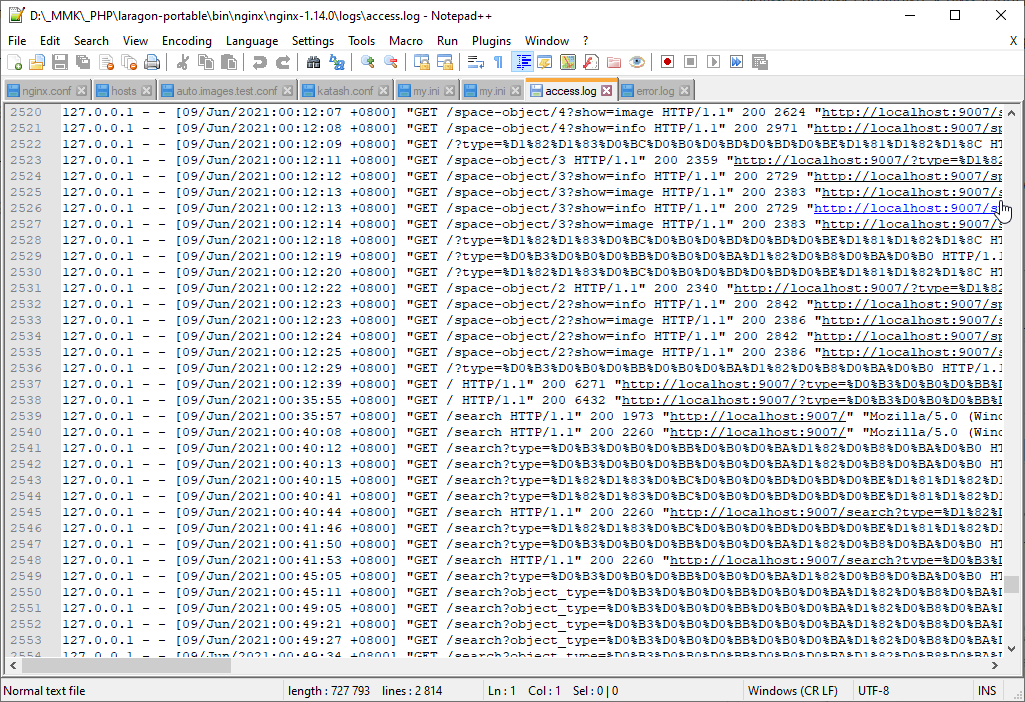
There are also restrictions on the length of the address string. Therefore, it is not possible to send long data via GET requests.
That is why POST requests were invented for transferring large amounts of data. They allow you to transfer virtually unlimited amounts of data in encrypted form.
And we will use them specifically to create new entities in the database.
So, let’s create a new controller and call it SpaceObjectCreateController
<?php
require_once "BaseSpaceTwigController.php";

class SpaceObjectCreateController extends BaseSpaceTwigController {
    public $template = "space_object_create.twig";
}
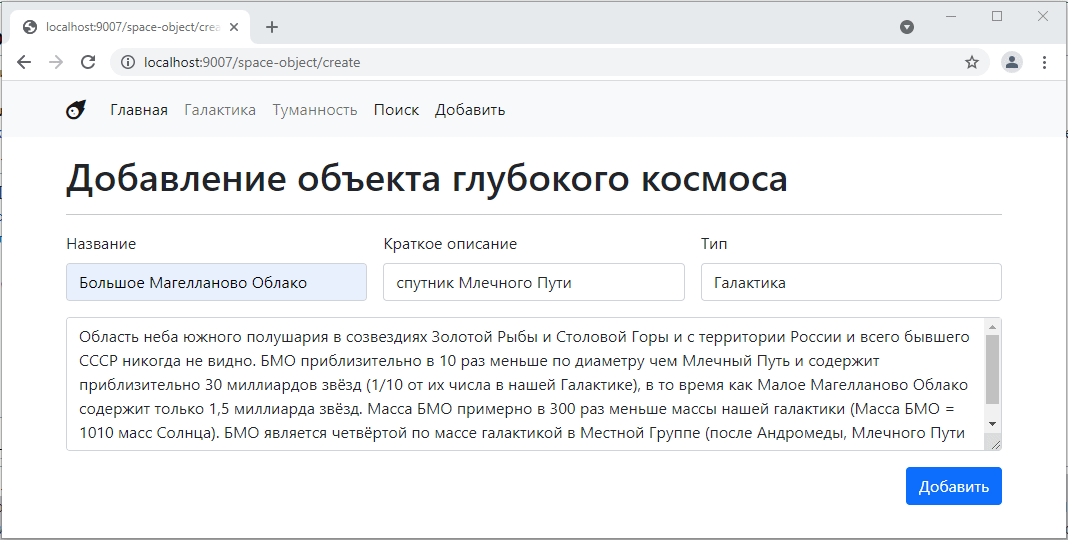
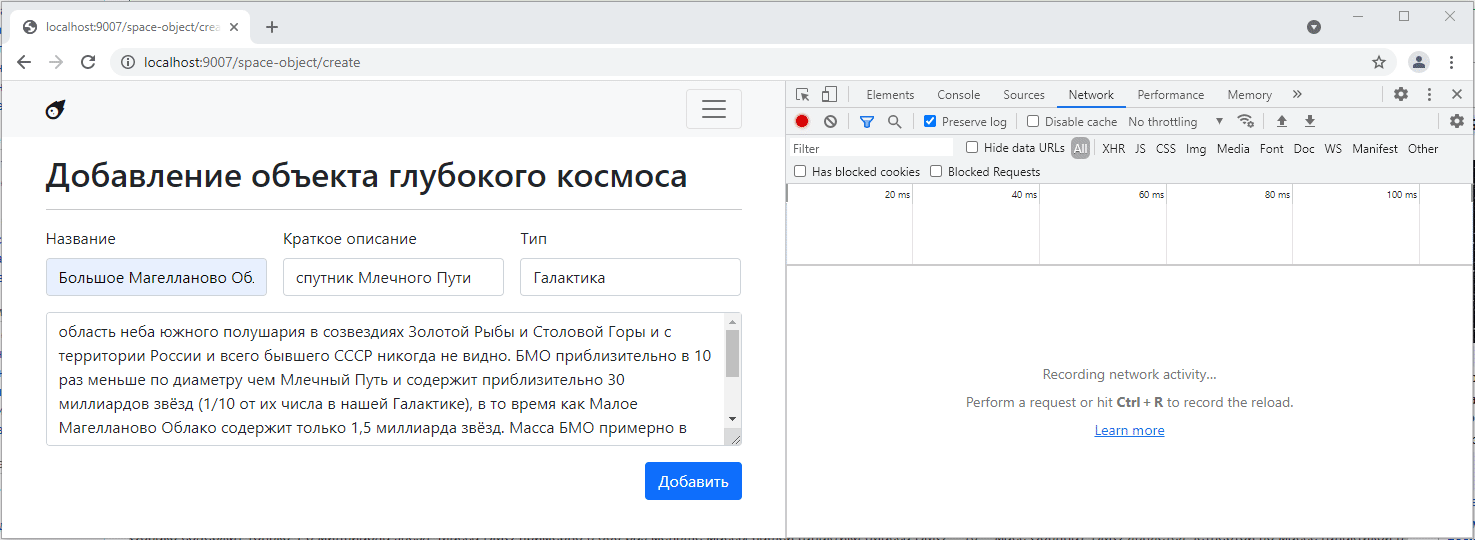
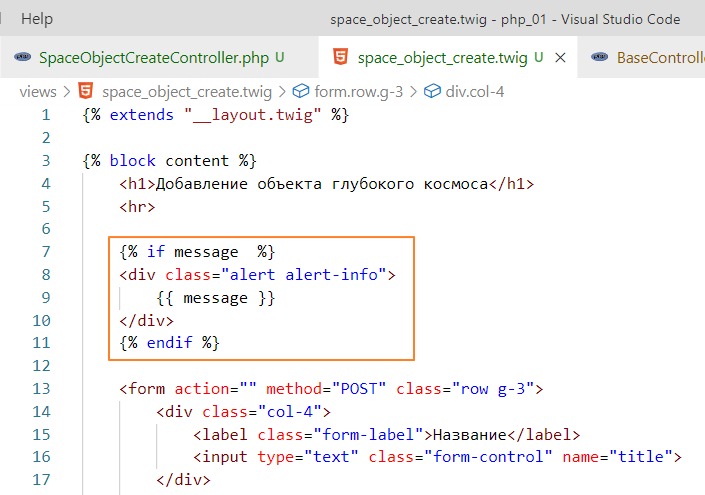
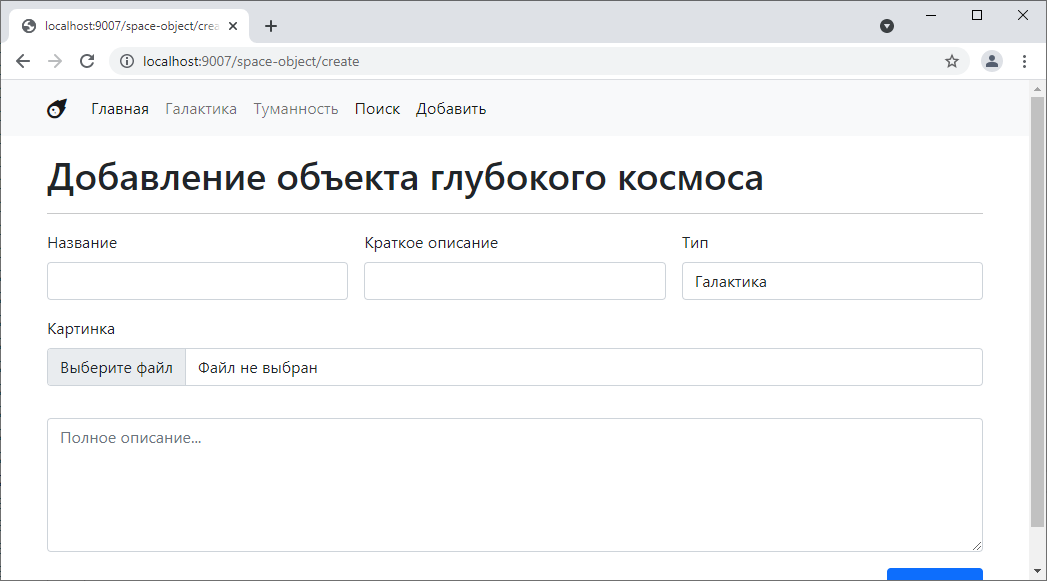
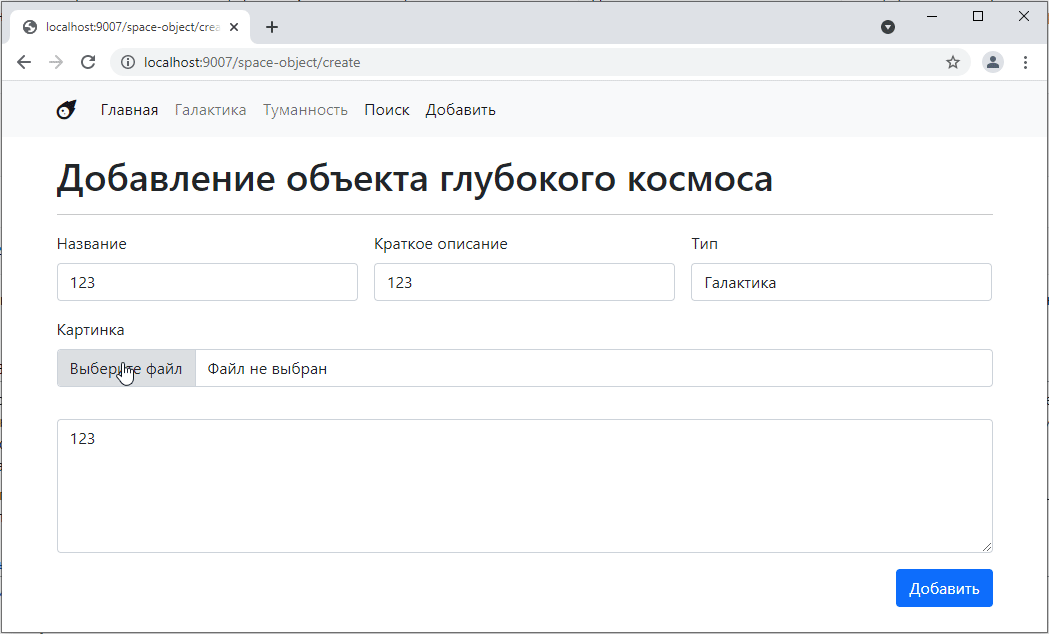
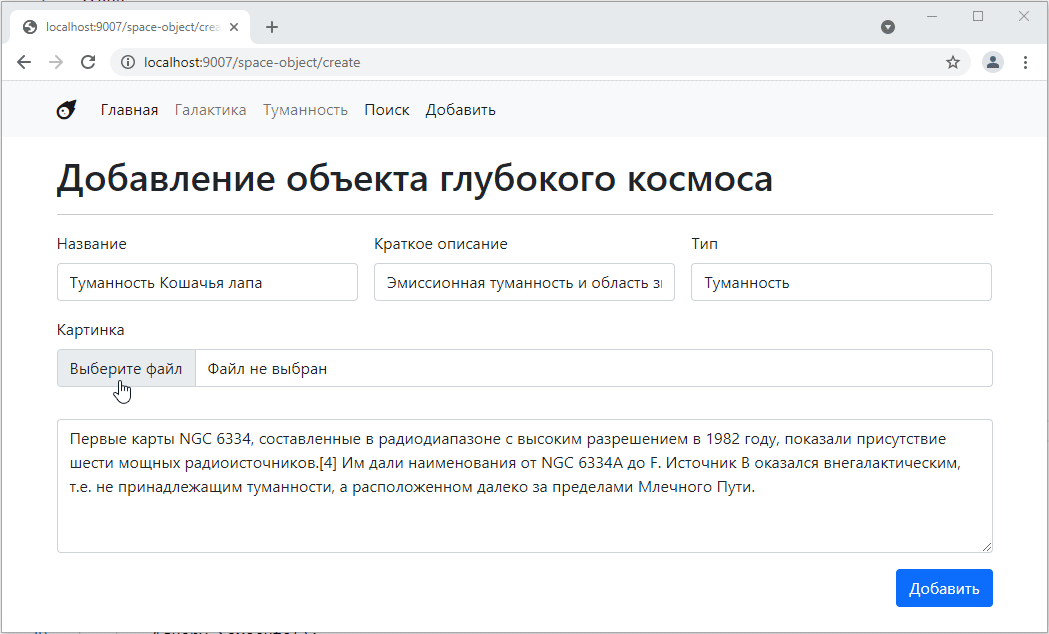
Let’s create a form for it in the template where we can write all the fields (without images for now)
{% extends "__layout.twig" %}

{% block content %}
    <h1>Adding a deep space object</h1>
    <hr>

    <form class="row g-3">
        <div class="col-4">
            <label class="form-label">Title</label>
            <input type="text" class="form-control" name="title">
        </div>
        <div class="col-4">
            <label class="form-label">Short description</label>
            <input type="text" class="form-control" name="description">
        </div>
        <div class="col-4">
            <label class="form-label">Type</label>
            <select class="form-control" name="type">
                <option value="galaxy">Galaxy</option>
                <option value="nebula">Nebula</option>
            </select>
        </div>
        <div class="col-12">
            <textarea name="info" placeholder="Full description..." class="form-control" rows="5"></textarea>
        </div>
        <div class="col-12 text-end">
            <button type="submit" class="btn btn-primary">Add</button>
        </div>
    </form>

{% endblock %}
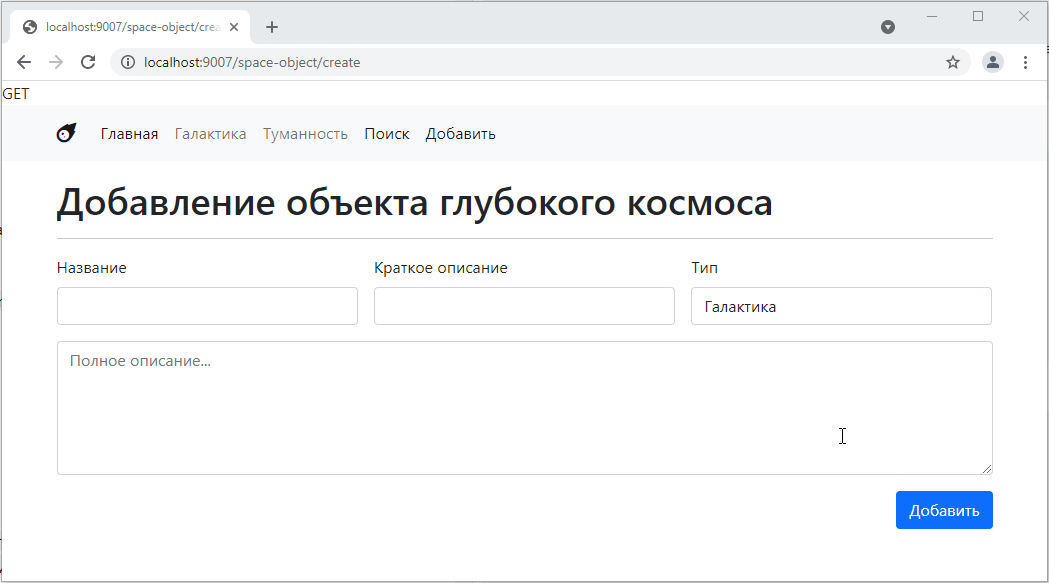
It will turn out like this:
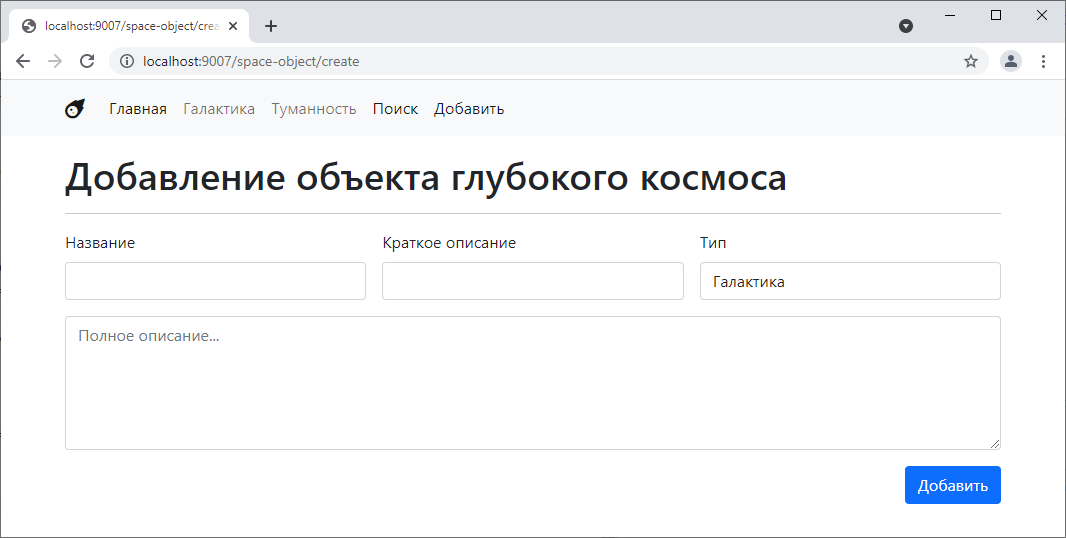
You can try arranging it differently. Add some colors. In general, make it more fun.
Let’s add it to the router
$router->add("/space-object/create", SpaceObjectCreateController::class);
and a link to the navigation
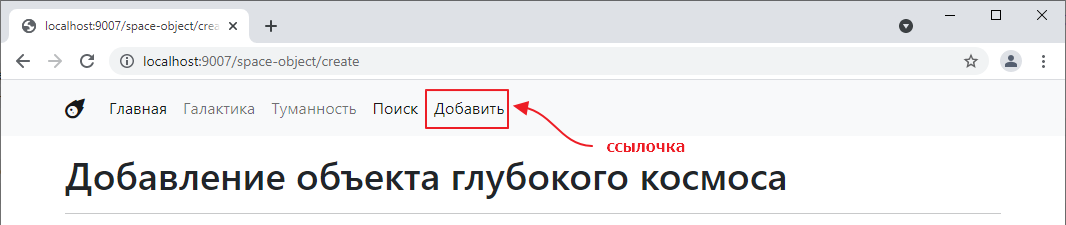
Let’s try filling in the fields and clicking the Add button:

As we saw in the previous task, clicking the button reloads the page, and the values from the form are passed to the parameters.
This is standard form behavior. In fact, we can specify a transition to another page. To do this, we need to change the action attribute of the form tag. For example, after creating an object, it often makes sense to go to a page with a complete list of objects. We can do this as follows:
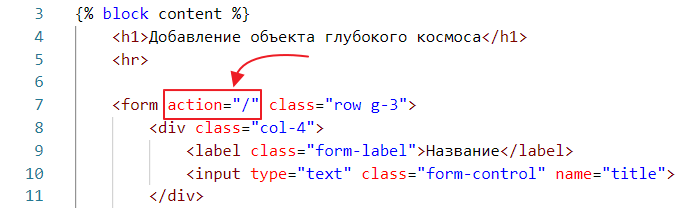
Let’s try again:
By the way, we have added processing of the type parameter on the main page, so the attempt to create an object currently works as a filter.
In general, this is not exactly what we want. So let’s leave the action attribute empty:
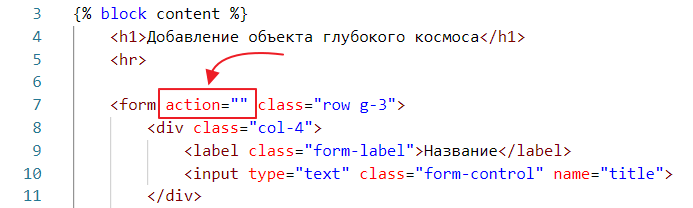
An empty attribute is equivalent to no attribute.
So, I want to implement the following behavior: when I click the add button, I want to stay on the same page, but I want to see a message there saying that the object has been saved.
Plus, I don’t want any data to be visible in the address bar.
Why is it so important that random data does not end up in the address bar?
The thing is, in a real application, it may not only contain harmless data such as names or descriptions, but also passwords in plain text, phone numbers, various secret tokens, etc. And all this data then ends up in the browser history, where it can be viewed if desired.
We will use a POST request for this very purpose.
In order for the form to send a POST request when the button is clicked, the form tag must have the method attribute added to it.
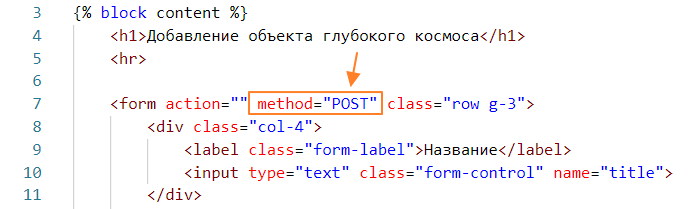
Let’s try sending the form now:

It looks like nothing happened. But in fact, the SpaceObjectCreateController controller was called, only the method was POST instead of GET.
You can see this in the console (F12 or Ctrl+Shift+I)
That is, you can see both the request method and its parameters here.
It is important to understand that whenever you manually type a URL into the address bar of your browser, a GET request is sent. In response, the content of the page is returned as a result of this request.
When you click the button with type=submit on a form that has “POST” specified in the method, a POST request is sent. In response, the content of the page is returned as the result of this request.
Since our controllers are currently unable to distinguish between POST and GET requests, the result of submitting the form is identical to the response when opening the page for adding an object.
Let’s teach our controller to distinguish between different types of requests.
First, we need to understand how to determine the type of request. To do this, we can use the REQUEST_METHOD key in the global $_SERVER object. Let’s try to output it:
class SpaceObjectCreateController extends BaseSpaceTwigController {
    public $template = "space_object_create.twig";

    public function get()
    {
        echo $_SERVER["REQUEST_METHOD"];

        parent::get();
    }
}
Let’s test it:
Not bad, in principle. But it turns out that regardless of the request type, we end up in the get function, which outputs the request type.
It would probably be nice to have a separate get method and a separate post method for different request types.
Go to BaseController and add the process_response method there
abstract class BaseController {
    // ...

    // new function
    public function process_response() {
        $method = $_SERVER["REQUEST_METHOD"]; // extract the method
        if ($method == "GET") { // if it's a GET request, call get
            $this->get();
        } else if ($method == "POST") { // if it's a POST request, call get
            $this->post();
        }
    }

    // remove abstract here, and just make two empty methods for get and post requests
    public function get() {}
    public function post() {}
}
Now go to Router.php and change the controller’s get method call to process_response
class Router {
    // ...

    public function get_or_default($default_controller) {
        // ...

        return $controllerInstance->process_response(); // now we have process_response instead of get
    }
}
Now let’s try to call our form.
Since we don’t have a handler for the post method, it shows a blank page.
I can, for example, make the post method simply call the get method, like this:
class SpaceObjectCreateController extends BaseSpaceTwigController {
    public $template = "space_object_create.twig";

    public function get()
    {
        echo $_SERVER["REQUEST_METHOD"];

        parent::get();
    }

    // added
    public function post() {
        $this->get(); // call get
    }
}
Let’s take a look:

As we can see, the same page simply opens.
But let’s say I want to display some additional message, such as “object created.”
Then I need to be able to modify the controller context from the post method and pass it to get.
To do this, let’s tweak BaseController a little:
abstract class BaseController {
    // ...

    public function process_response() {
        $method = $_SERVER["REQUEST_METHOD"];
        $context = $this->getContext(); // call context here
        if ($method == "GET") {
            $this->get($context); // and here I just pass it inside
        } else if ($method == "POST") {
            $this->post($context); // and here
        }
    }

    public function get(array $context) {} // added as a parameter here
    public function post(array $context) {} // and here
}
Let’s tweak TwigBaseController.php:
class TwigBaseController extends BaseController {
    // ...

    public function get(array $context) { // added an argument to get
        echo $this->twig->render($this->template, $context); // and here we'll change getContext to just $context
    }
}
And let’s update Controller404.php
class Controller404 extends BaseSpaceTwigController {
    public $template = "404.twig";
    public $title = "Page not found";

    public function get(array $context)
    {
        http_response_code(404);
        parent::get($context);
    }
}
Now let’s go back to SpaceObjectCreateController and make the following changes:
class SpaceObjectCreateController extends BaseSpaceTwigController {
    public $template = "space_object_create.twig";

    public function get(array $context) // added a parameter
    {
        echo $_SERVER["REQUEST_METHOD"];

        parent::get($context); // passed the parameter
    }

    public function post(array $context) { // added a parameter
        $context["message"] = "You have successfully created an object"; // added a message

        $this->get($context); // passed the parameter
    }
}
and add the message output to the template
check:
Of course, we haven’t added anything yet, but we’ve created the illusion
To actually add the object, we need to read the parameters that were on the form. Similar to a GET request, we can access them via $_POST. To do this, we write:
    public function post(array $context) {
        // get the values of the fields from the form
        $title = $_POST["title"];
        $description = $_POST["description"];
        $type = $_POST["type"];
        $info = $_POST["info"];

        // create the query text
        $sql = <<<EOL
INSERT INTO space_objects(title, description, type, info, image)
VALUES(:title, :description, :type, :info, "")
EOL;

        // prepare the database query
        $query = $this->pdo->prepare($sql);
        // bind the parameters
        $query->bindValue("title", $title);
        $query->bindValue("description", $description);
        $query->bindValue("type", $type);
        $query->bindValue("info", $info);

        // execute the query
        $query->execute();

        $context["message"] = "You have successfully created an object";
        $context["id"] = $this->pdo->lastInsertId(); // get the id of the newly added object

        $this->get($context);
    }
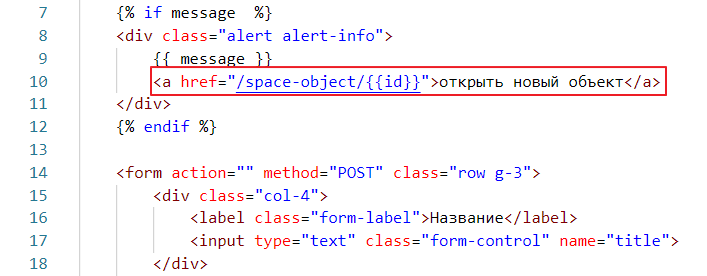
And for complete happiness, let’s add a link to this object in the message.
Testing:
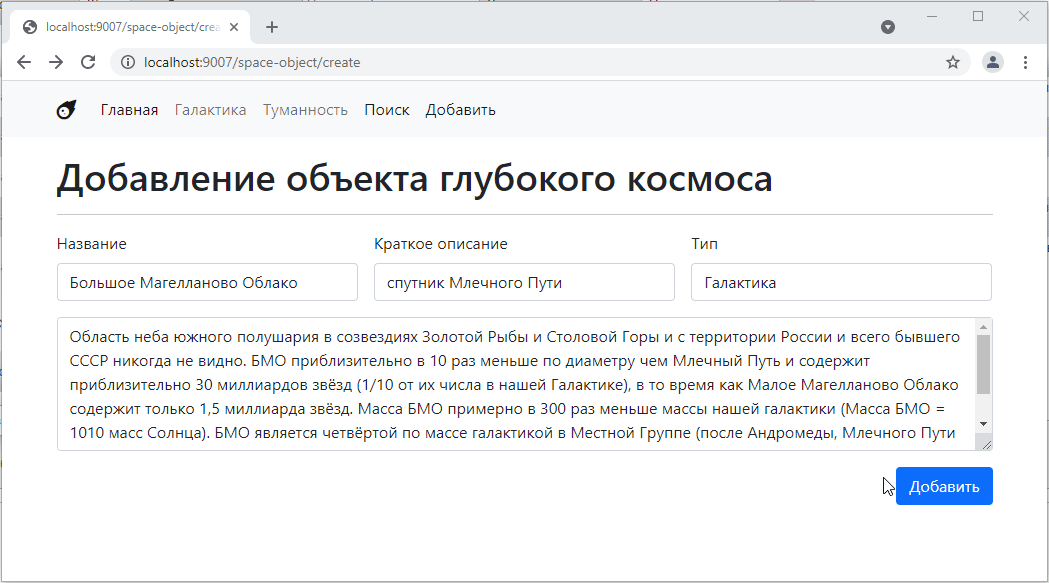
Awesome! =)
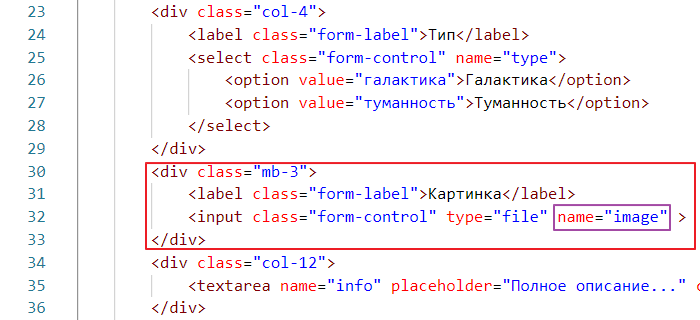
Now let’s link the image to the object. If the image is just a link to a picture on the internet, then it’s simple: take the text field and paste the text there.
But if we want to add the ability to select an image from the user’s computer, This is where things get complicated, because now we have to upload the image to our server ourselves (in our case, to the public folder) and generate a link to that image.
Let’s try to do that.
First, we need to add a special input for selecting a file [https://getbootstrap.com/docs/5.0/forms/form-control/#file-input] (https://getbootstrap.com/docs/5.0/forms/form-control/#file-input)
put it somewhere here
and name it image
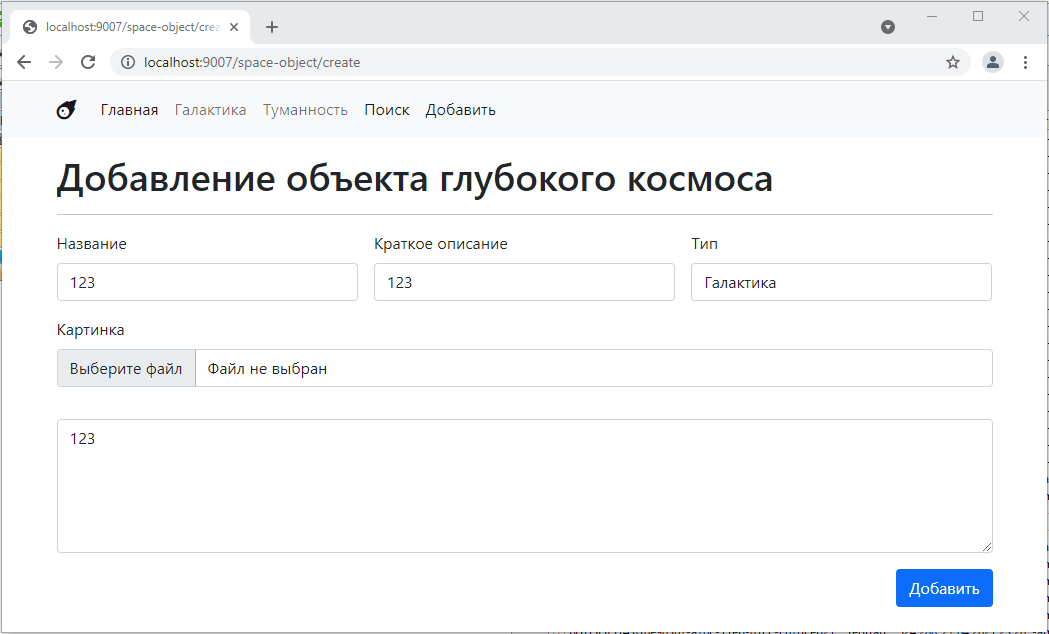
Now let’s see what happens when we make a post request with an image.
By the way, for obvious reasons, you cannot upload an image via a GET request, because an image can weigh several megabytes, and when it comes to files, even several gigabytes, and no address bar can handle such data. But this is just for reference…
So, let’s go to our SpaceObjectCreateController, disable adding records to the database there so as not to create unnecessary ones

and add the output of data from $_POST
class SpaceObjectCreateController extends BaseSpaceTwigController {
    public $template = "space_object_create.twig";

    public function post(array $context) {
        $title = $_POST["title"];
        $description = $_POST["description"];
        $type = $_POST["type"];
        $info = $_POST["info"];

        // added
        echo "<pre>";
        print_r($_POST);
        echo "</pre>";

        // ...
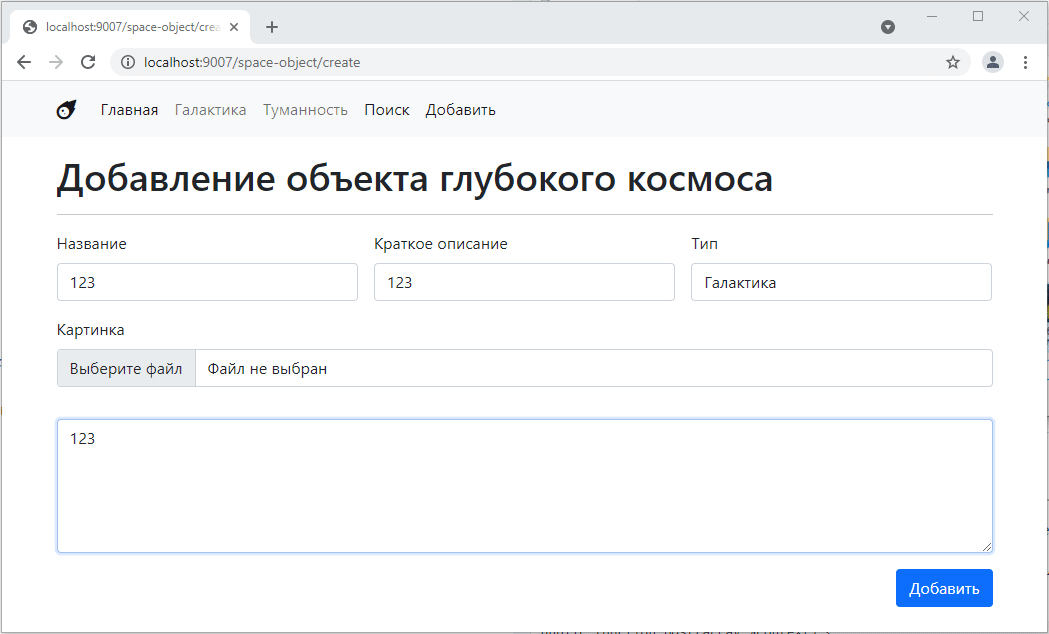
testing
As you can see, there is no information about the image in the post request. Where can we get it?
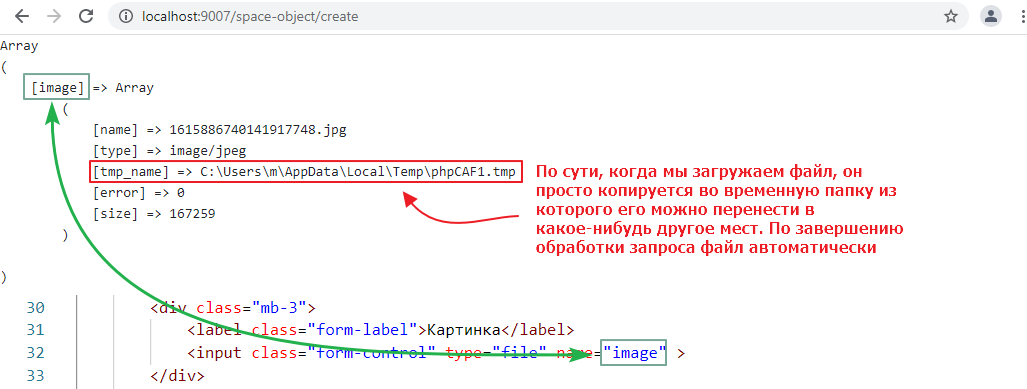
The fact is that information about files is stored in another special object called $_FILES. Let’s try to output it
public function post(array $context) {
    $title = $_POST["title"];
    $description = $_POST["description"];
    $type = $_POST["type"];
    $info = $_POST["info"];

    echo "<pre>";
    // print_r($_POST);
    print_r($_FILES); // added
    echo "</pre>";
Let’s try again:
Hmm, now it outputs an empty array…
In general, there is another subtle point here: in order for the form to start sending file data to the server, you need to add another attribute to it, like this:

Run it again
Oh, the data is sent =)
The data structure is simple: there is a key that corresponds to the value specified in name on the form, and information about the file, including its name, type, size, and the path where PHP saved the data during the request.
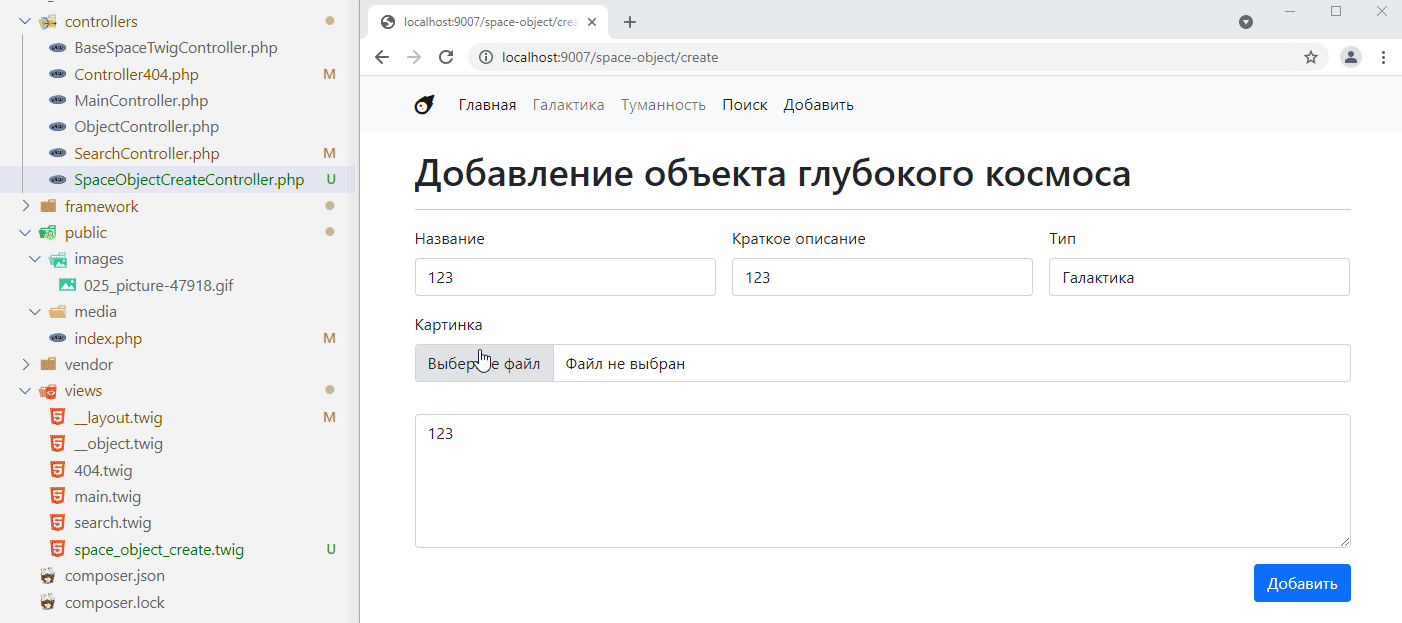
So, in order for the file to become part of our site, we need to copy it to the public folder. To do this, it is recommended to create a subfolder. It is usually called media, and if you use a version control system, this folder should be added to gitignore, since on any more or less active site it starts to weigh gigabytes of data after a couple of weeks.
Add

and now edit the controller so that it copies the file there:
class SpaceObjectCreateController extends BaseSpaceTwigController {
    public $template = "space_object_create.twig";

    public function post(array $context) {
        $title = $_POST["title"];
        $description = $_POST["description"];
        $type = $_POST["type"];
        $info = $_POST["info"];

        // extracted values from $_FILES
        $tmp_name = $_FILES["image"]["tmp_name"];
        $name =  $_FILES["image"]["name"];

        // use a function that checks
        // that the file was actually uploaded via a POST request
        // and if so, moves it to the location specified in the second argument
        move_uploaded_file($tmp_name, "../public/media/$name");
Let’s check that the file was actually uploaded:
You can even open it directly via the link. My file is called 1615886740141917748.jpg, so the link will be [http://localhost:9007/media/1615886740141917748.jpg] (http://localhost:9007/media/1615886740141917748.jpg), here:
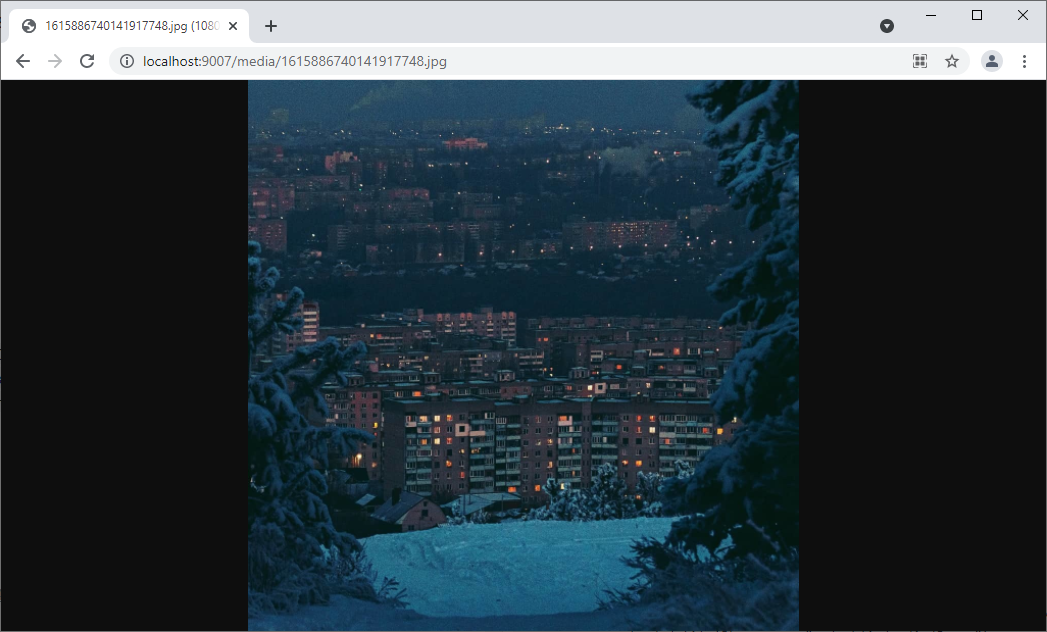
and now all that remains is to transfer this link, without the server address http://localhost:9007, to the database for this file.
    public function post(array $context) {
        // ...

        $tmp_name = $_FILES["image"]["tmp_name"];
        $name =  $_FILES["image"]["name"];
        move_uploaded_file($tmp_name, "../public/media/$name");
        $image_url = "/media/$name"; // generate a link without the server address

        $sql = <<<EOL
INSERT INTO space_objects(title, description, type, info, image)
VALUES(:title, :description, :type, :info, :image_url) -- pass the variable to the query
EOL;

        $query = $this->pdo->prepare($sql);
        $query->bindValue("title", $title);
        $query->bindValue("description", $description);
        $query->bindValue("type", $type);
        $query->bindValue("info", $info);
        $query->bindValue("image_url", $image_url); // bind the link value to the image_url variable
        $query->execute();

        // and then as usual
        $context["message"] = "You have successfully created an object";
        $context["id"] = $this->pdo->lastInsertId();

        $this->get($context);
    }
Let’s check:
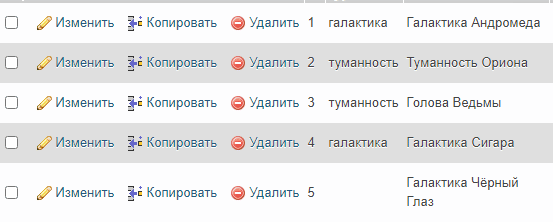
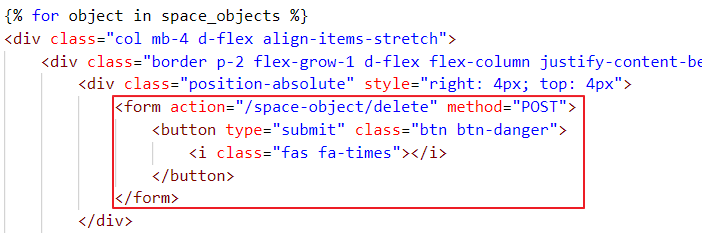
Deleting objects is the letter D in the word CRUD. It’s the simplest operation. In principle, there are 100,500 ways to implement it. But the easiest way is to create a separate controller that will be responsible for deletion and send a post request to it via a form.
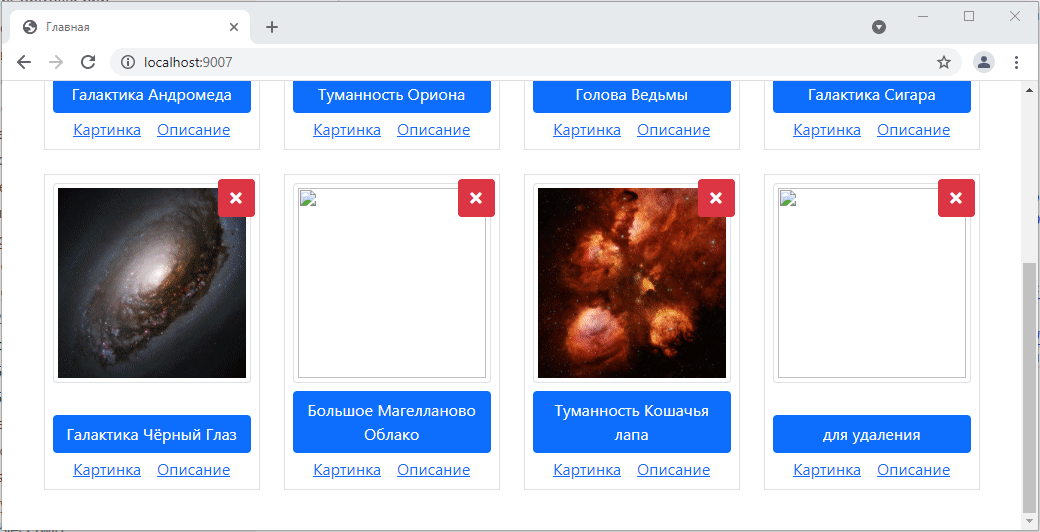
Just so you don’t delete anything you don’t want to, create new objects specifically for deletion. I made three of them:
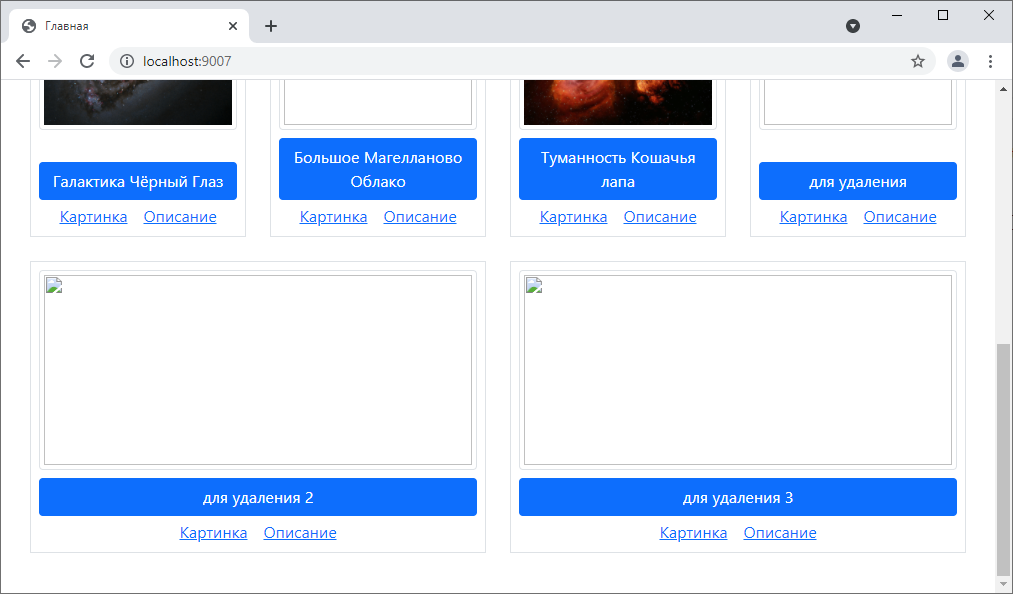
And let’s add a button for deletion.
It will look like this:
Since it makes sense to delete by ID, because it is unique, there are two ways to pass this ID
In any case, we create a controller for deletion:
<?php

// for once, we inherit not from TwigBaseController but from BaseController
class SpaceObjectDeleteController extends BaseController {
    public function post(array $context)
    {
        $id = $_POST["id"]; // took the id

        $sql =<<<EOL
DELETE FROM space_objects WHERE id = :id
EOL; // formed the query

        // executed
        $query = $this->pdo->prepare($sql);
        $query->bindValue(":id", $id);
        $query->execute();
    }
}
Let’s connect it to index.php
$router->add("/space-object/delete", SpaceObjectDeleteController::class);
Now let’s link it to the button.
Let’s try clicking it:
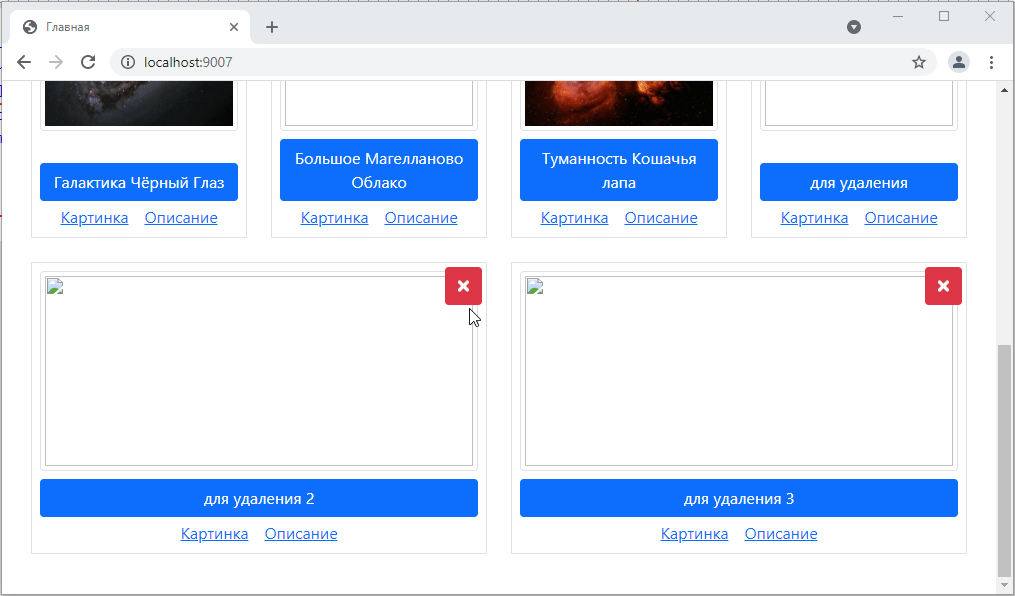
Error! Why? Because we are requesting the id like this $id = $_POST["id"]; but we are not passing it from the form.
To pass it, we need to add an input. Let’s add it:
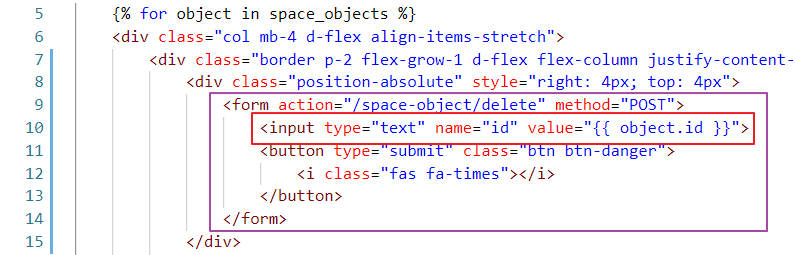
Here, by the way, is an interesting point: we can immediately specify a default value in the input in the value attribute. So, in our case, we specify object.id. Let’s see how it looks.
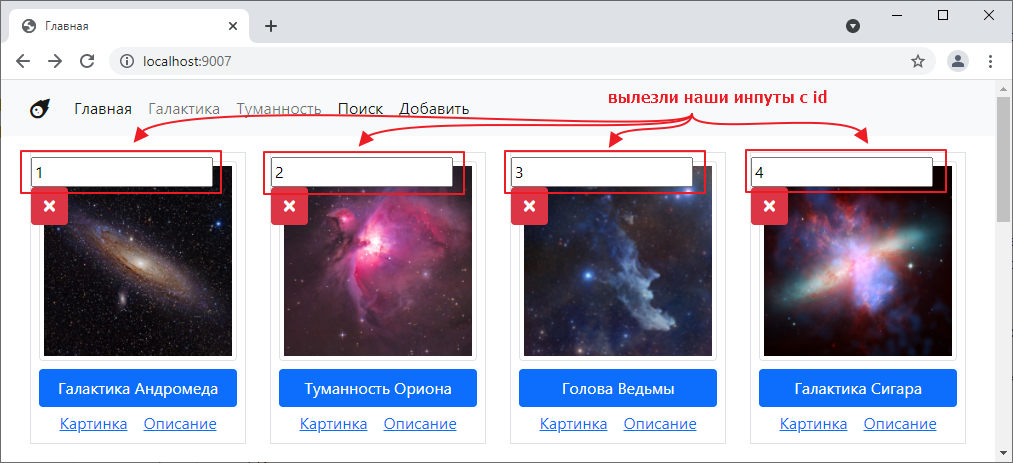
So, on the one hand, we have solved the problem of the missing field, but on the other hand, why are they being displayed?
Fortunately, there is a way to hide these fields. To do this, we need to specify hidden in the type attribute of the inputs, like this:

Then we will formally have a field on the form. But it will not be visible:
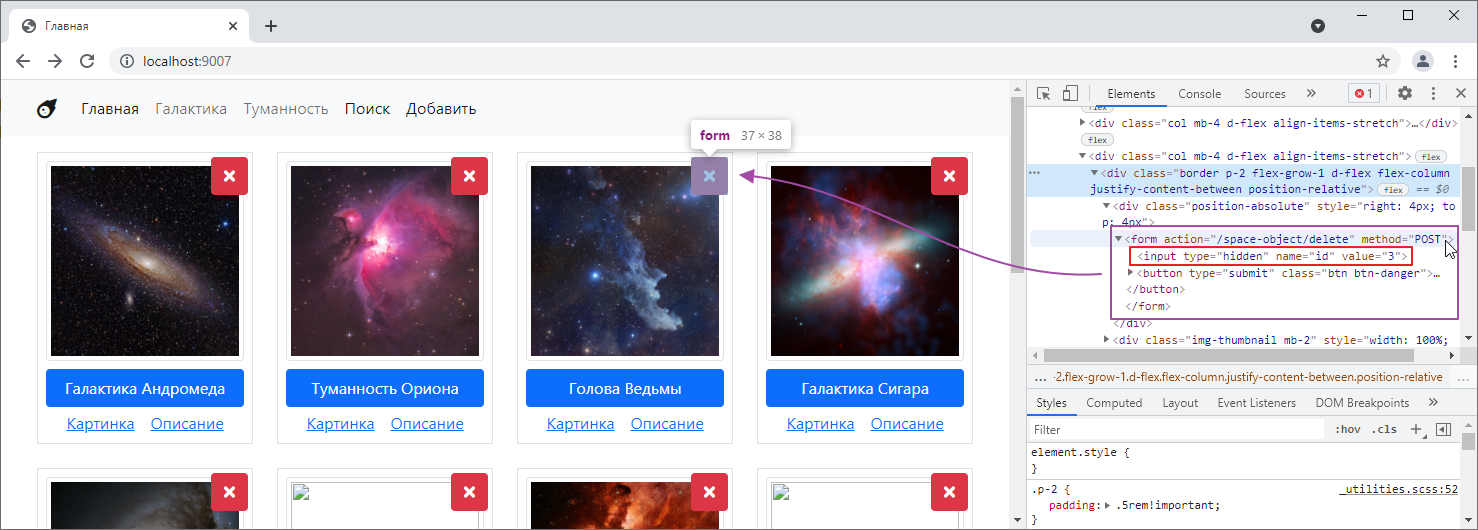
Let’s try clicking on it:
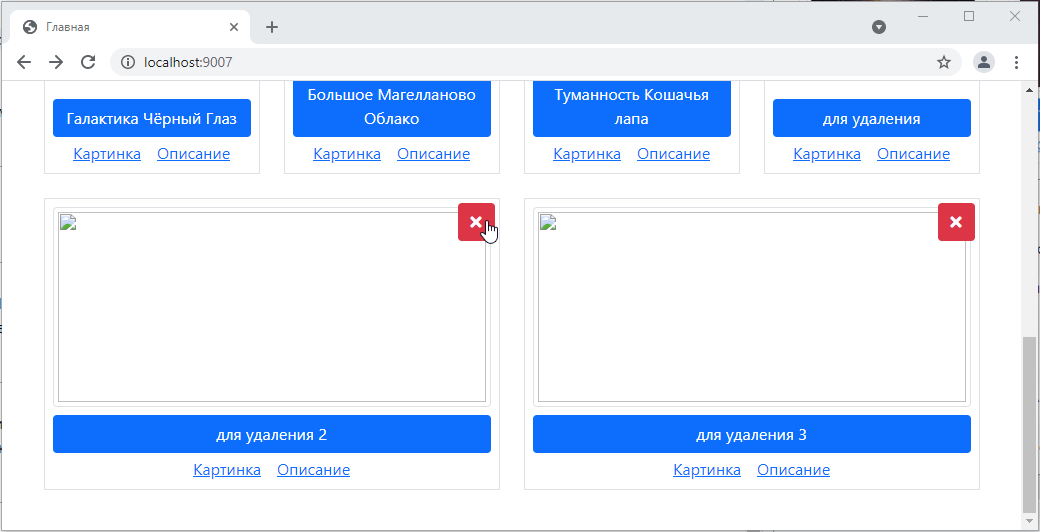
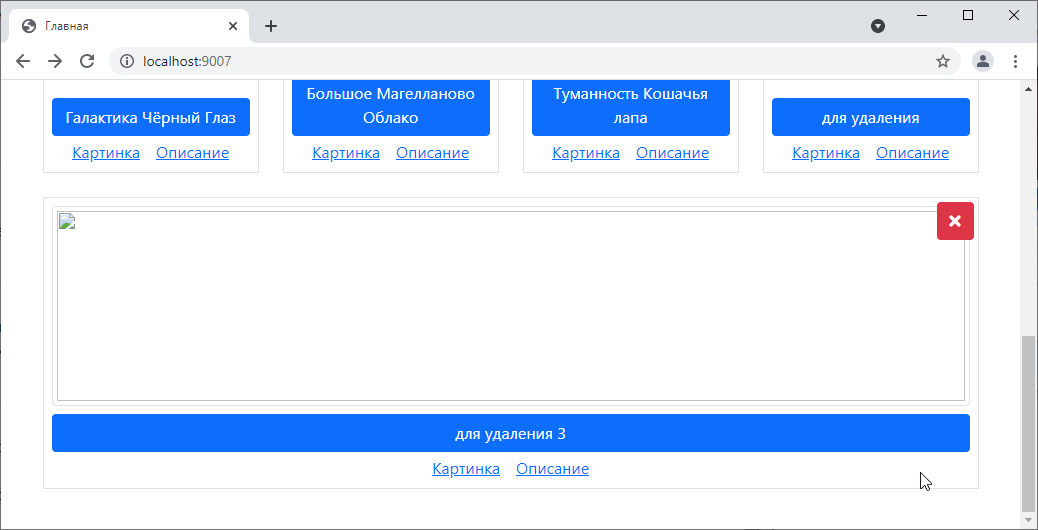
Well, we were redirected to a blank page… but if we go back to the main page, the object will indeed disappear:
But of course, sending the user to a blank page is not ideal, which is why there is such a thing as a redirect.
This is when, instead of returning a text response, the controller sends a request to the browser to go to another page on the site. The browser reads it and automatically makes a GET request to the address specified in the redirect.
This is done as follows:
class SpaceObjectDeleteController extends BaseController {
    public function post(array $context)
    {
        // ...

        $query->execute();

        // set the Location header to the new path; I want to go to the home page, so I write /
        header("Location: /");
        exit; // after  header("Location: ...") you need to write exit
    }
Let’s try it:
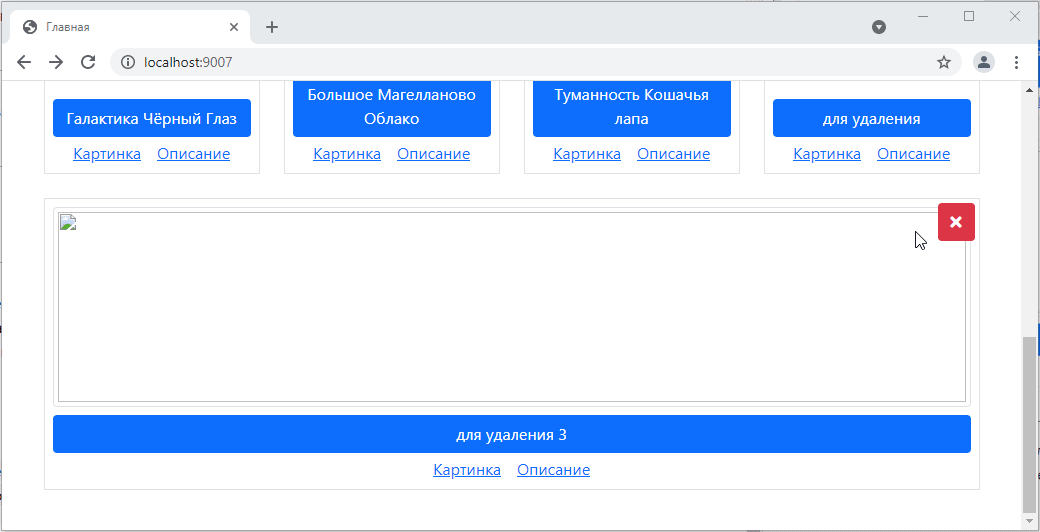
Beautiful! =)
The second method is slightly more modern. Instead of using input under id, you pass the id to the form action.
That is, we create a new route in the router:
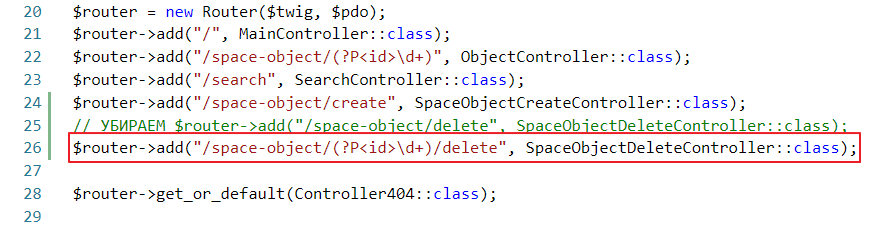
In the controller, instead of $_POST, we use $this->params
<?php

class SpaceObjectDeleteController extends BaseController {
    public function post(array $context)
    {
        $id = $this->params["id"]; // replaced $_POST

        // ...
        exit;
    }
And on the form, we leave only the button and the corrected action:
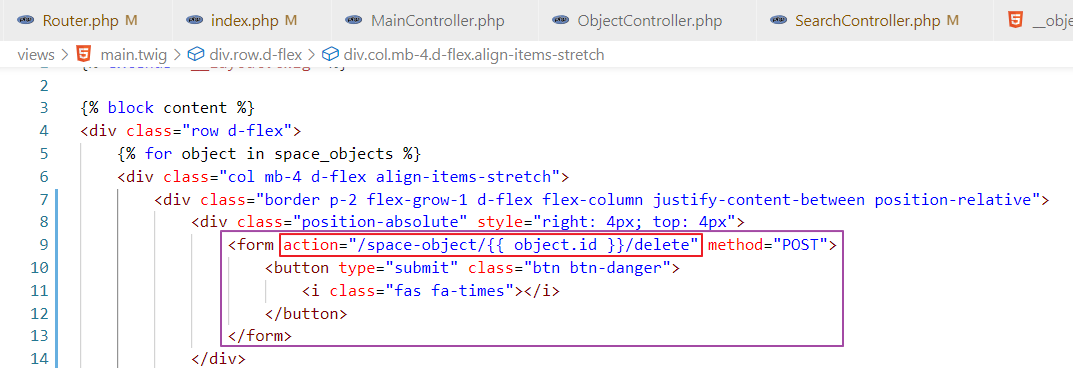
Let’s try it:
It works the same way =)
The update operation, or the letter U from the abbreviation CRUD, is, on the one hand, the most difficult operation to implement. On the other hand, once we have already implemented the add and delete operations, it will not be difficult to implement it.
I will not show in detail how to do the update here, but will just sketch out how it can be implemented.
The controller can be based on the Create controller, as the part responsible for processing the post request will remain almost unchanged.
In get, you just need to pull out the object by id.
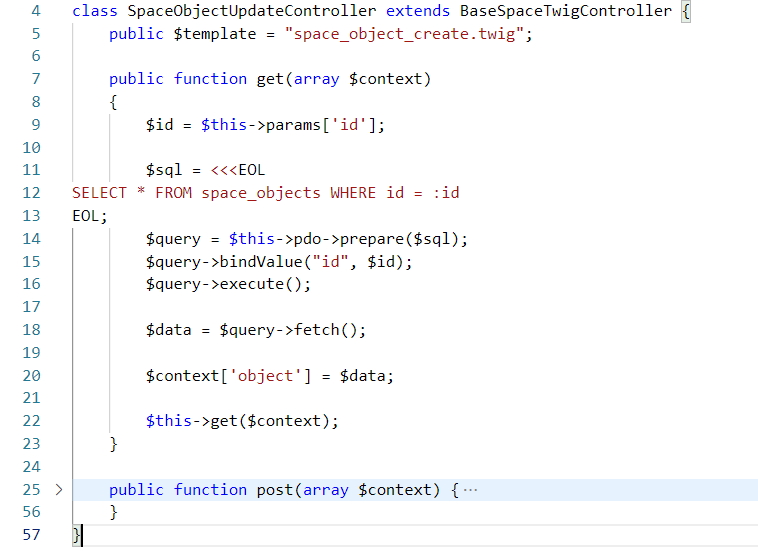
In the router, add a route for editing by identifier.
$router->add("/space-object/(?P<id>\d+)/edit", SpaceObjectUpdateController::class);
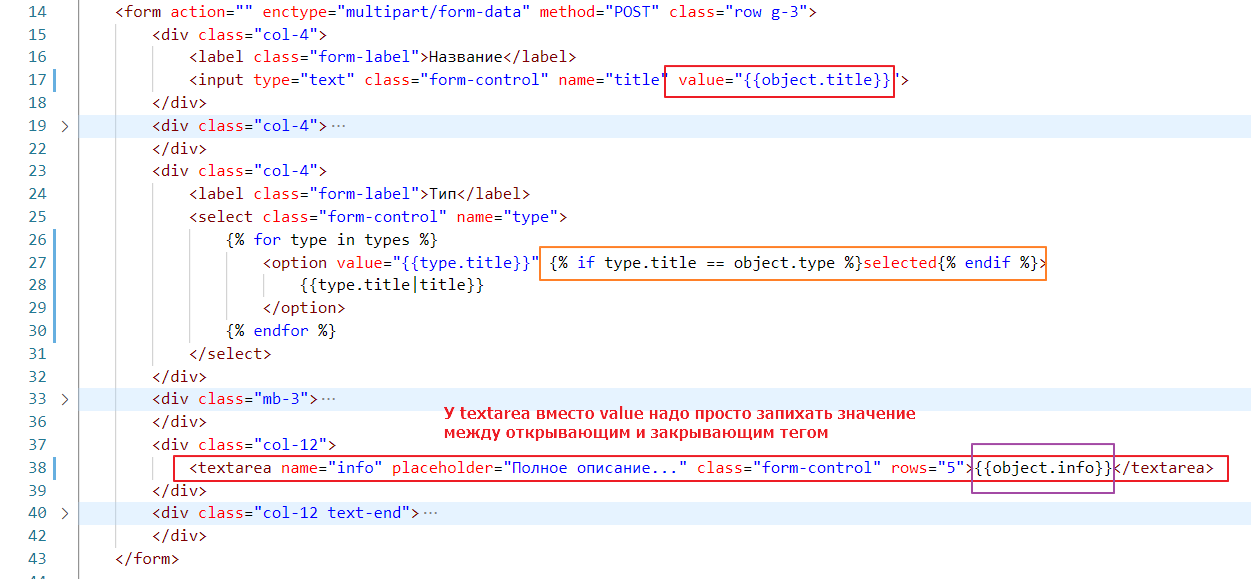
You can create a new template or modify the old one. The main thing you need to do is make sure that all the fields in all inputs are filled in, i.e., specify the value attribute:
And add a button somewhere that will simply link to the edit page.